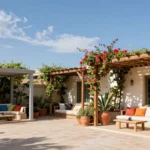
Got an old tree trunk taking up space in your yard? We’ve discovered that these natural treasures can become stunning outdoor features with the right creative vision. Instead of hauling that trunk to the curb, you can transform it into something extraordinary that’ll make your neighbors stop and stare.
Tree trunks offer endless possibilities for outdoor projects that combine rustic charm with practical function. Whether you’re dreaming of a unique planter, a cozy seating area, or an eye-catching garden sculpture, that weathered wood holds incredible potential waiting to be unleashed.
We’ll show you how to turn your discarded tree trunk into the centerpiece of your outdoor space. From simple weekend projects to more ambitious transformations, these ideas will help you create something truly special while adding natural beauty and character to your industry.
Transform Your Dead Tree Trunk Into a Stunning Planter
Dead tree trunks offer incredible potential as natural planters that blend seamlessly with your garden industry. We’ll explore three essential techniques that turn ordinary stumps into extraordinary growing containers.
Hollow Out the Center for Annual Flowers
Carving out the trunk’s interior creates the perfect space for vibrant seasonal blooms. We recommend using a chainsaw or chisel to remove 8-12 inches of wood from the center, leaving 2-3 inches of wall thickness for structural integrity.
Start the hollowing process by drilling pilot holes around the perimeter. This technique prevents the wood from cracking and gives you better control over the carving process. Focus on creating a bowl shape that’s wider at the top than the bottom.
Choose annual flowers like petunias, marigolds, or impatiens for the best visual impact. These colorful blooms thrive in contained spaces and provide continuous color throughout the growing season. We’ve found that grouping 3-5 different flower varieties creates stunning contrast against the natural wood texture.
Create Multiple Levels for Cascading Plants
Building tiered sections transforms your tree trunk planter into a living sculpture. We suggest carving 2-3 different depths within the same trunk, with each level approximately 4-6 inches deep and varying in diameter.
Position trailing plants like ivy, sweet potato vine, or trailing petunias in the upper tiers. These cascading varieties naturally flow downward, creating beautiful waterfall effects that enhance the trunk’s vertical structure. The natural wood backdrop makes green foliage appear more vibrant and lush.
Fill lower levels with upright plants such as herbs, small shrubs, or compact perennials. This layered approach maximizes your growing space while creating visual interest from multiple angles. We’ve discovered that alternating plant heights and textures produces the most dramatic results.
Add Drainage Holes for Proper Water Management
Drilling drainage holes prevents root rot and ensures healthy plant growth in your trunk planter. We recommend creating 3-4 holes measuring ½ inch in diameter at the bottom of each planting cavity, spacing them evenly around the perimeter.
Use a spade bit or hole saw to create clean, precise drainage openings. Position these holes at slight angles to encourage water flow away from the planter base. This prevents standing water that could damage both plants and wood over time.
Place a layer of gravel or small stones at the bottom before adding soil. This drainage layer should be 1-2 inches deep and helps maintain proper water flow while preventing soil from washing out through the drainage holes. We’ve found that adding industry fabric over the gravel keeps soil in place while allowing excess water to escape.
Create a Magical Fairy Garden Using Your Tree Trunk
 1")
We can transform our tree trunk into an enchanting fairy wonderland that captivates visitors year-round. This magical approach combines artistry with nature to create a whimsical focal point in our outdoor space.
Carve Small Doorways and Windows
Carving miniature doors and windows creates the illusion of a tiny fairy dwelling within our tree trunk. We’ll start by marking small rectangular or arched shapes on the trunk surface using a pencil or chalk. Drill pilot holes at the corners and use a coping saw or small chisel to carefully carve out the openings. Small wooden pieces from create stores make perfect ready-made doors that we can attach with weatherproof adhesive. Recessed windows add depth and realism to our fairy house design. We can create window frames using thin strips of wood or create foam for a more finished appearance.
Add Miniature Furniture and Accessories
Miniature furniture pieces bring our fairy garden to life with charming details that spark imagination. We’ll position tiny benches, tables, and fairy-sized chairs around the base of our tree trunk to create outdoor living spaces. Resin figurines, mushrooms, and toadstools scattered throughout the area add character and whimsy to the scene. Small animals like rabbits, squirrels, or birds create a sense of movement and life. Clay or polymer clay accessories can be handmade for a personal touch. We should secure lightweight items with small amounts of clear adhesive to prevent them from being displaced by wind or rain.
Install LED Lights for Nighttime Ambiance
LED fairy lights transform our tree trunk fairy garden into a magical nighttime spectacle that glows after dark. We’ll thread small battery-powered LED strings through the carved windows and doorways to create warm interior lighting. Solar-powered lights eliminate the need for battery changes and provide eco-friendly illumination. Positioning lights behind translucent materials like frosted plastic or fabric creates a soft, diffused glow. We can weave additional light strands through surrounding plants or along pathways to extend the magical atmosphere. Timer-controlled lights automatically activate at dusk for consistent nighttime beauty without manual operation.
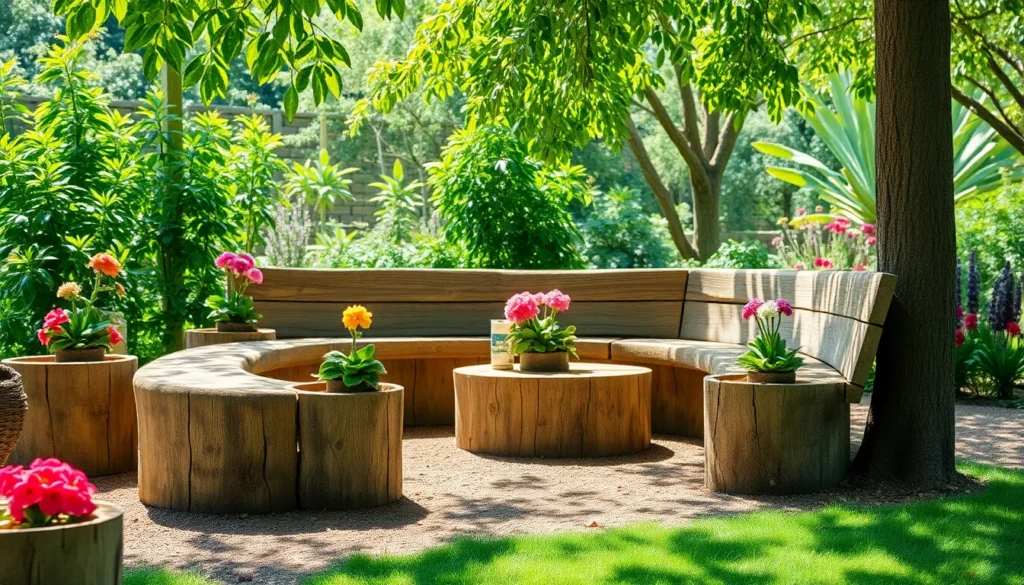
Build a Rustic Outdoor Seating Area
 2")
Tree trunks naturally evolve into perfect outdoor seating when we transform them with proper preparation and thoughtful arrangement. This approach creates inviting gathering spaces that blend seamlessly with our garden’s organic aesthetic.
Sand and Seal the Trunk Surface
Sanding transforms rough tree trunk surfaces into comfortable seating options by removing splinters, bark remnants, and uneven edges. We’ll need medium-grit sandpaper to smooth the top surface where people will sit, followed by fine-grit paper for a polished finish.
Sealing protects our newly prepared trunk seats from weather damage, insects, and natural decay that can compromise their longevity. Outdoor wood sealant acts as a barrier against moisture while improving the trunk’s natural rustic charm and making future cleaning much easier.
Application requires us to apply the sealant evenly across all exposed surfaces, paying special attention to the top seating area and any cuts we’ve made. Two coats typically provide optimal protection against outdoor elements while preserving the wood’s natural beauty.
Add Comfortable Cushions and Pillows
Cushions instantly upgrade tree trunk seating from functional to genuinely comfortable by providing soft padding on hard wooden surfaces. Weather-resistant fabrics ensure our cushions withstand rain, sun, and seasonal changes without deteriorating or losing their vibrant colors.
Pillows add visual interest and extra comfort while allowing us to introduce pops of color that complement our outdoor space’s existing design scheme. Round cushions work particularly well on trunk seats since they match the natural circular shape of most tree stumps.
Storage becomes important during harsh weather, so we’ll want cushions with removable, washable covers or dedicated outdoor storage to protect our investment. Quick-dry foam filling prevents moisture retention that could lead to mold or mildew problems.
Position Multiple Trunks for Group Seating
Arranging several trunk seats in a circle or semi-circle around fire pits or garden focal points creates natural conversation areas that encourage social interaction. This grouping strategy transforms individual seats into cohesive outdoor furniture sets that accommodate gatherings of various sizes.
Height variation adds visual interest when we combine trunks of different sizes, creating ever-changing seating arrangements that suit both adults and children. Lower stumps work well as footrests or side tables, while taller ones serve as primary seating.
Spacing matters for comfortable conversation, so we’ll position trunks about 3-4 feet apart to allow easy movement while maintaining an intimate gathering atmosphere. Strategic placement near existing landscaping features helps our seating area feel integrated rather than imposed on the natural environment.


Last update on 2026-02-28 / Affiliate links / Images from Amazon Product Advertising API
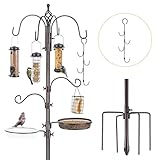
Design a Natural Bird Feeding Station
 3")
Transform that old tree trunk into a stunning natural bird feeding station that’ll bring countless feathered visitors to your outdoor space. We can create an inviting habitat by incorporating multiple elements that cater to different bird species’ needs.
Install Multiple Feeding Ports at Various Heights
Mount several feeders at different heights along your tree trunk to accommodate various bird species’ feeding preferences. Different birds prefer feeding at exact elevations, so positioning feeders from 3 feet to 8 feet high ensures you’ll attract cardinals, chickadees, nuthatches, and woodpeckers to your station.
Attach feeders directly onto the trunk using sturdy brackets or screws to mimic natural feeding spots where birds would normally forage. This arrangement reduces competition among species since each type of bird can find its preferred feeding level without interference from others.
Space feeders at least 2 feet apart vertically to prevent territorial disputes and allow multiple birds to feed simultaneously. We recommend using different feeder types at each level, such as tube feeders for small songbirds, suet feeders for woodpeckers, and platform feeders for ground-feeding species.
Create Perching Areas for Different Bird Species
Add natural perches by attaching smaller branches or decorative branch perches directly onto your tree trunk feeding station. These landing spots provide essential resting areas for birds waiting their turn to feed, especially benefiting larger species that need sturdy support.
Position perches 6 to 12 inches away from feeders to give birds comfortable access while maintaining their natural feeding behaviors. We can use varying branch thicknesses to accommodate different foot sizes, from thin twigs for finches to thicker branches for jays and cardinals.
Install removable perches that you can change periodically to provide fresh perching spots and maintain the station’s appearance. This flexibility also allows us to adjust the setup based on which bird species visit most frequently throughout different seasons.
Add a Water Feature for Complete Bird Habitat
Incorporate a shallow birdbath or dripper system near your feeding station to create a complete habitat that supports both feeding and hydration needs. Water attracts significantly more bird species than food alone, often doubling the variety of visitors to your outdoor space.
Mount the water feature securely on a tree stump or attach it directly to your trunk at a height of 2 to 3 feet for optimal bird access. We recommend using a basin no deeper than 2 inches to ensure safety for small songbirds while providing adequate bathing space for larger species.
Position the water source where birds feel secure, ideally near natural cover but open enough for easy predator detection. Adding a dripper or small fountain creates movement and sound that birds find irresistible, significantly increasing the attraction power of your tree trunk bird station.


Last update on 2026-02-28 / Affiliate links / Images from Amazon Product Advertising API
Craft a Unique Garden Art Sculpture
 4")
Tree trunks offer us endless possibilities for creating distinctive outdoor masterpieces that showcase our artistic vision. We can transform these natural canvases into whimsical fairy houses, detailed animal figures like squirrels, or abstract shapes that enhance our garden’s rustic charm.
Carve Intricate Patterns and Designs
Detailed carving transforms ordinary tree trunks into personalized works of art using chainsaws or chisels. We can create geometric patterns, natural motifs featuring leaves and animals, or completely customized sculptures that add texture and visual interest to our outdoor spaces. Artistic expression flourishes when we carve beyond simple functional elements to develop decorative masterpieces. Intricate designs elevate our tree trunk projects from basic garden features to stunning focal points that reflect our unique style and creativity.
Apply Weather-Resistant Stains and Finishes
Protective treatments ensure our carved tree trunk sculptures withstand outdoor elements year-round without compromising their beauty. We must apply weather-resistant stains, sealants, and finishes to shield the wood from moisture damage, insect infestations, and harmful UV rays. These specialized treatments preserve the natural wood grain while preventing cracking, warping, and decay that could ruin our artistic investment. Quality finishes maintain the sculpture’s appearance through changing seasons, allowing us to enjoy our garden art for years without constant maintenance or replacement concerns.
Position as a Focal Point in Your Industry
Strategic placement maximizes the visual impact of our carved tree trunk sculptures throughout the garden space. We should position these artistic pieces near pathways, entrances, seating areas, or garden beds where they naturally draw visitors’ attention and complement surrounding plants. The sculpture serves as a visual anchor that ties together various industry elements while creating natural gathering points for family and guests. Thoughtful positioning transforms our carved tree trunk from a simple decorative element into an integral part of our outdoor design that enhances the overall aesthetic appeal of our property.


Last update on 2026-02-28 / Affiliate links / Images from Amazon Product Advertising API
Construct a Functional Outdoor Storage Solution
 5")
We can transform tree trunks into practical storage units that keep our garden tools organized and protected from the elements. These natural storage answers blend seamlessly with outdoor landscapes while providing essential functionality.
Hollow Out Space for Garden Tool Storage
Hollow out the interior of your tree trunk to create ample storage space for garden tools and outdoor equipment. Start by selecting stumps or cut logs with diameters around 18-22 inches high for optimal practical use. Remove the inner wood carefully using chisels, rotary tools, or specialized hollowing equipment to create a spacious cavity.
Smooth the interior walls with sandpaper to prevent splinters and create a clean storage environment. Apply wood sealant to the hollowed cavity to protect against moisture damage and extend the trunk’s lifespan. This natural container can accommodate shovels, rakes, pruning shears, gloves, and other essential gardening supplies.
Add Hinged Lids for Weather Protection
Attach a hinged lid to your hollowed trunk storage to shield contents from rain, snow, and pests. Create the lid from weatherproof materials like cedar, treated lumber, or composite decking that can withstand outdoor conditions. Install heavy duty outdoor hinges using stainless steel screws to prevent rust and corrosion.
Weather resistant hardware ensures smooth operation even after exposure to harsh elements. Seal all joints and edges with outdoor wood sealant to create a watertight barrier. The hinged design allows easy access to stored items while maintaining complete weather protection when closed.
Create Compartments for Different Items
Build interior compartments using removable wooden dividers to organize various garden tools and supplies efficiently. Install vertical panels or adjustable inserts that separate the storage space into designated areas for different categories of items. Small tools like hand pruners and trowels fit perfectly in compact sections, while larger implements require wider compartments.
Design removable organizer trays for seeds, plant labels, and small accessories that might otherwise get lost in the larger space. Consider adding hanging hooks or clips to the interior walls for lightweight items like gloves or twine. Mount the entire trunk storage unit on a wheeled plant caddy to create a mobile garden station that moves wherever you need it most.


Last update on 2026-02-28 / Affiliate links / Images from Amazon Product Advertising API
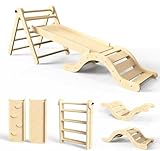
Build a Natural Play Structure for Children
 6")
Tree stumps and trunk sections offer incredible opportunities for creating captivating natural playgrounds that develop children’s motor skills and imagination. We’ll transform these organic materials into climbing gyms, balance beams, stepping logs, and bases for bridges that encourage physical activity while connecting kids with nature.
Create Safe Climbing Surfaces and Handholds
Select hardwood trunks for the best durability and stability in your climbing structure. Northern hardwoods provide excellent strength while resisting weather damage over time.
Sand all climbing surfaces until they’re completely smooth to eliminate any rough patches or potential splinters. This step protects little hands and feet during active play sessions.
Cut trunk bases flat to prevent tipping or rolling when children climb or balance on the logs. A stable foundation ensures confident movement and reduces injury risks.
Shape natural handholds by carving small indentations or grooves into the trunk surface where children’s hands naturally grip. These organic features blend seamlessly with the wood’s natural texture.
Attach climbing grips to smooth sections where additional handholds improve accessibility for smaller children. Secure these additions with appropriate hardware rated for outdoor use.
Add Slides and Rope Attachments
Bolt climbing ropes securely to sturdy trunk sections using galvanized hardware that withstands outdoor conditions. These ever-changing elements add swinging and climbing challenges that kids love.
Create natural slides by covering soil mounds adjacent to tree sections with smooth materials. Position these features near trunk climbing areas for seamless play flow.
Install rope bridges between multiple trunks or logs to encourage coordination and balance development. Tie these connections at appropriate heights for your children’s age groups.
Position slide entrances at the top of trunk climbing sections to reward successful climbers with fun descent options. This combination motivates children to develop their climbing skills.
Add swing attachments to overhead branches or sturdy horizontal trunk sections for classic playground enjoyment. Ensure all mounting points can support ever-changing loads safely.
Ensure All Edges Are Smooth and Splinter-Free
Sand every surface that children might touch during play, paying special attention to cut ends and natural bark edges. Use progressively finer grits for the smoothest finish possible.
Apply wood treatment to resist rot, insects, and weather damage while maintaining the natural appearance. Choose child safe products specifically designed for playground equipment.
Inspect regularly for new splinters, loose bark, or weather damage that could create safety hazards. Schedule monthly maintenance checks to catch issues early.
Round all corners and edges to eliminate sharp angles that could cause cuts or bruises during active play. This attention to detail prevents common playground injuries.
Replace damaged sections promptly when wear becomes visible or when wood begins to deteriorate. Maintaining structural integrity protects children and extends your playground’s lifespan.


Last update on 2026-02-28 / Affiliate links / Images from Amazon Product Advertising API
Design a Fire-Safe Outdoor Lighting Feature
 7")
We can transform our tree trunk projects into stunning nighttime displays while maintaining complete safety. Proper lighting design ensures both visual impact and fire prevention.
Install Solar-Powered LED Strip Lights
Solar-powered LED strip lights offer the safest and most environmentally friendly option for illuminating tree trunks. These energy-efficient strips eliminate the need for electrical wiring while consuming minimal power throughout the night. We can wrap them around trunk sections or adhere them along carved grooves to create even illumination patterns.
LED technology produces very low heat compared to traditional incandescent bulbs, significantly reducing fire risks around wooden surfaces. The solar panels should be positioned in areas that receive direct sunlight during the day to ensure adequate charging. Most solar LED strips provide 6-8 hours of continuous lighting after a full day’s charge, making them perfect for evening entertainment and industry ambiance.
Installation becomes incredibly simple since we don’t need to run electrical connections to remote trunk locations. The strips come in various colors including warm white, cool white, and multicolor options to complement different garden aesthetics. Weather-resistant ratings ensure these lights withstand outdoor conditions year-round without compromising safety or performance.
Create Carved Patterns for Light Projection
Carved patterns transform ordinary tree trunk lighting into artistic light displays that cast intricate shadows and projections. We can etch geometric designs, leaf motifs, or custom patterns directly into the trunk surface using wood carving tools. These carved areas become focal points when illuminated by strategically placed uplights or LED strips.
Focused lighting through carved openings creates dramatic shadow patterns on surrounding surfaces like walls, fences, or ground areas. The depth and width of each carved section determines the intensity and sharpness of the projected light. We should seal all carved areas with weather-resistant wood sealers to prevent moisture damage and maintain the carved details over time.
Themed designs work particularly well for special occasions or seasonal displays. Heart shapes for Valentine’s Day, stars for Independence Day, or snowflakes for winter holidays add personalized touches to our outdoor lighting schemes. The carved patterns remain visible during daylight hours as decorative elements, providing year-round visual interest even when lights aren’t operating.
Position for Maximum Evening Impact
Strategic positioning of lights around tree trunks creates maximum visual drama during evening hours. Uplights placed at the base of trunks highlight the natural vertical structure while creating striking upward shadows through branches and leaves. This technique emphasizes the trunk’s texture and bark patterns for enhanced visual appeal.
Downlighting from overhead branches provides soft, diffused illumination that mimics natural moonlight filtering through tree canopies. We can combine multiple lighting angles to create depth and dimension, using both uplights and downlights simultaneously for layered effects. Spiral wrapping patterns around trunk circumferences produce even, warm glows that outline the entire trunk structure.
Solar panels require discrete placement where they receive adequate sunlight without disrupting the aesthetic design. Hidden mounting behind plants or decorative elements keeps the technical components out of sight while maintaining functionality. Power sources should be positioned within recommended cable lengths but away from high-traffic areas to prevent accidental damage or tripping hazards.


Last update on 2026-02-28 / Affiliate links / Images from Amazon Product Advertising API
Conclusion
We’ve explored many ways to breathe new life into old tree trunks and transform them into stunning outdoor features. From functional planters and cozy seating areas to whimsical fairy gardens and artistic sculptures these projects offer endless possibilities for creativity.
The beauty of repurposing tree trunks lies in their versatility and natural appeal. Whether you’re creating storage answers play structures for children or ambient lighting features each project adds character while serving a practical purpose.
With proper preparation techniques and safety considerations these DIY transformations can enhance your outdoor space for years to come. Start with one project that matches your skill level and watch as your garden becomes a showcase of sustainable creativity and natural beauty.
Frequently Asked Questions
What can I do with old tree trunks instead of throwing them away?
Old tree trunks can be transformed into stunning outdoor features like unique planters, rustic seating areas, garden sculptures, bird feeding stations, storage solutions, children’s play structures, and decorative lighting features. These creative projects add natural charm to your outdoor space while giving new life to discarded materials.
How do I turn a tree trunk into a planter?
To create a tree trunk planter, hollow out the interior using chisels and drills, leaving thick walls for structural integrity. Add drainage holes at the bottom, then fill with quality potting soil. You can create tiered sections for cascading plants or use it as a single large planter for annual flowers.
What is a fairy garden and how do I make one from a tree trunk?
A fairy garden is a miniature magical landscape that creates an enchanting garden feature. Carve small doorways and windows into the trunk, add miniature furniture and accessories, and incorporate LED lights for nighttime ambiance. This whimsical project adds charm and wonder to any outdoor space.
How do I create comfortable seating from tree trunks?
Sand the trunk surfaces smooth to eliminate splinters, then apply weather-resistant sealant for protection. Add comfortable cushions and pillows for enhanced comfort. Arrange multiple trunks in circles or semi-circles with varying heights to create inviting conversation areas that blend naturally with your landscape.
Can tree trunks be used to make bird feeding stations?
Yes, tree trunks make excellent bird feeding stations. Install multiple feeding ports at different heights to attract various bird species. Add perching areas and consider incorporating a small water feature. This creates a complete habitat that brings wildlife activity and natural beauty to your garden.
How do I protect wooden garden sculptures from weather damage?
Apply weather-resistant stains and protective finishes to shield sculptures from rain, UV rays, and temperature changes. Choose high-quality outdoor wood treatments and reapply annually. Proper sealing ensures your artistic creations maintain their beauty and structural integrity for years to come.
What safety measures should I consider for children’s play structures?
Select durable hardwoods and sand all surfaces smooth to prevent splinters. Ensure stable bases to prevent tipping and conduct regular safety inspections. Check for loose components, weather damage, or wear patterns. Proper maintenance and supervision ensure safe, enjoyable play experiences for children.
How can I add lighting to tree trunk features safely?
Use solar-powered LED strip lights for safe, environmentally friendly illumination. These lights produce minimal heat and are easy to install without electrical hazards. Carve decorative patterns to enhance light projection and position strategically for maximum evening visual impact while maintaining safety standards.