Planning an outdoor wedding? One element that can transform your celebration from ordinary to extraordinary is a DIY dance floor. We’ve helped countless couples create magical moments under the stars with custom dance spaces that don’t break the budget.
Creating your own outdoor wedding dance floor isn’t just cost-effective—it’s a chance to add a personal touch to your special day. Whether you’re envisioning a rustic wooden platform beneath twinkling lights or a sleek, polished surface surrounded by flowers, we’ll guide you through every step of the process. From selecting weather-resistant materials to ensuring proper installation on uneven terrain, our comprehensive guide covers all the essentials.
10 DIY Outdoor Wedding Dance Floor Ideas for Your Special Day
1. Wooden Pallet Dance Floor
Wooden pallets offer an affordable base for a rustic dance floor. Begin by collecting 15-20 uniform pallets from local businesses or online marketplaces. Clean them thoroughly and sand down any rough edges to prevent splinters. Arrange the pallets in your desired dance floor shape, securing them together with metal brackets or strong zip ties. For a finished look, cover the top with plywood sheets and add a protective sealant to guard against moisture. This option creates a stable surface while maintaining that charming farmhouse aesthetic many couples love.
2. Interlocking Deck Tiles
Interlocking deck tiles provide a user-friendly DIY solution that requires minimal tools. Purchase enough tiles to cover your planned dance area—approximately 100 square feet works well for 30-40 guests. These tiles simply snap together and can be installed directly over grass, dirt, or concrete. Many versions come pre-finished and weather-treated, eliminating the need for additional sealing. Their portable nature also allows for easy storage and reuse for future events or home projects.
3. Painted Plywood Panels
Custom painted plywood creates a personalized dance floor that doubles as a wedding keepsake. Start with 4×8 sheets of ¾-inch exterior-grade plywood, cutting them to your desired dimensions. Sand all surfaces before applying an exterior primer. Use masking tape to create geometric patterns, monograms, or other designs before painting with outdoor-rated paints. Connect the panels using flat metal mending plates on the underside, ensuring the joints align perfectly. This approach allows unlimited creativity while providing a smooth dancing surface.
4. Artificial Turf Dance Area
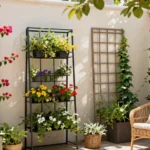
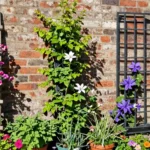
Artificial turf transforms a simple lawn space into a designated dance area without extensive construction. Purchase high-quality artificial grass with a short pile height to help easy movement. Create a level base using crushed stone or sand before rolling out the turf. Secure the edges using industry staples or heavy decorative objects like potted plants. Outline the space with string lights or lanterns to clearly define the dancing area after sunset. Guests will appreciate the cushioned surface that prevents sinking heels.
5. Vinyl Floor Covering
Vinyl flooring offers durability and water resistance perfect for outdoor celebrations. Measure your desired dance area and purchase commercial-grade vinyl sheets or interlocking tiles. Prepare the ground by removing debris and laying industry fabric to prevent weeds. For uneven terrain, consider adding a thin plywood subfloor first. Roll out the vinyl, allowing it to acclimate to outdoor temperature before securing the edges with heavy-duty tape or temporary adhesive. This affordable option comes in various colors and patterns to match your wedding theme.
6. Concrete Paver Dance Floor
Concrete pavers create a stable and elegant dance floor solution. Select uniform-sized pavers from your local hardware store—approximately 12×12 inch pavers work well for most designs. Level the ground and add 2-3 inches of sand as a base layer. Arrange the pavers in your preferred pattern, leaving minimal gaps between them. Sweep fine sand over the completed floor to fill joints and prevent shifting. Enhance the look with string lights around the perimeter or candles in hurricane vases for a romantic ambiance.
7. Indoor-Outdoor Carpet Tiles
Carpet tiles designed for outdoor use provide comfort and style for wedding dancers. Purchase waterproof, stain-resistant tiles with non-slip backing—about 80-100 tiles for a standard dance floor. These tiles typically measure 18×18 inches and can be installed directly over grass or hard surfaces without adhesive. Arrange them in checkerboard patterns or complementary colors to create visual interest. Their modular nature allows for easy replacement if any become damaged during the celebration.
8. Composite Decking Sections
Composite decking materials offer longevity and weather resistance ideal for outdoor dance floors. Build a simple frame using pressure-treated 2×6 lumber, creating sections no larger than 4×8 feet for manageable transport. Attach composite decking boards to the frame using deck screws, ensuring minimal gaps between boards. Add adjustable deck feet to each section’s corners to accommodate uneven ground. Connect the completed sections using hinges or brackets for a seamless dance surface that can be disassembled after the wedding.
9. Temporary Flooring Rental Hack
Transform rental floor pieces into a customized dance space for important savings. Rent basic dance floor sections from an event company, then personalize them yourself. Cover with removable vinyl decals featuring your wedding date, monogram, or meaningful quotes. Outline the perimeter with battery-operated LED tape lights attached with removable adhesive. Add corner flourishes using non-permanent decorative elements like fabric draping or flower arrangements. This approach provides professional-grade stability while allowing personal creative touches.
10. Natural Stone Mosaic
Natural stone creates a stunning dance floor that blends beautifully with garden settings. Select flat stones of similar thickness—slate or flagstone work particularly well. Prepare the area by removing 4-5 inches of soil and adding layers of crushed stone and sand for drainage. Arrange the stones in a mosaic pattern, keeping surfaces as level as possible. Fill gaps with decomposed granite or fine gravel, compacting thoroughly. This permanent installation requires more effort but creates a lasting addition to your property that extends beyond the wedding day.
Choosing the Perfect Location for Your DIY Dance Floor

Selecting the right spot for your outdoor wedding dance floor is crucial for ensuring guests have an unforgettable dancing experience. You’ll want to find a flat, open area with enough space for both dancing and guest movement. The ideal location should be conveniently close to key wedding elements like seating arrangements and food stations while staying clear of uneven terrain or obstacles that could pose safety hazards.
Assessing Ground Conditions
Surface Type matters significantly when installing a DIY dance floor. Grass, dirt, sand, or gravel surfaces require a sturdy base layer to prevent your floor from sinking, creating tripping hazards, or exposing guests to mud. These natural surfaces might look beautiful but need proper preparation before installing your dance floor components.
Leveling is essential for creating a safe, enjoyable dancing experience. We recommend using plywood or composite mats to establish a completely flat surface. Start by skimming the ground with plywood sheets, making adjustments as needed, and then securing them firmly to ensure maximum stability throughout your celebration.
For Base Materials, you have several effective options:
- Plywood offers an affordable and widely available solution that works well for outdoor settings. It’s important to seal plywood properly against moisture to prevent warping or deterioration during your event.
- Composite Mats like interlocking polyethylene tiles (such as Matrax Light Duty) provide excellent firmness while offering easy assembly. These specialized mats adapt well to slightly uneven ground and create a professional-looking surface with minimal effort.
Considering Weather Factors
Moisture Protection should be a top priority for any outdoor dance floor. Water-resistant materials such as treated plywood or plastic composite tiles effectively prevent warping and slippage that could occur from dew, rain, or humidity. This protection ensures your dance floor remains safe regardless of weather changes.
Secure Installation becomes particularly important in windy conditions. Anchoring your floor with stakes or weighted barriers around the perimeter will prevent shifting or lifting during your celebration, maintaining both safety and appearance.
Drainage considerations can’t be overlooked when selecting your location. The site should have natural runoff paths to avoid water pooling on or around your dance floor, which could damage the materials or create hazardous conditions for dancers.
For optimal planning, allocate approximately 9-12 square feet per dancing couple, assuming that 30-40% of your guests will be dancing simultaneously. Lightweight, portable options like interlocking tiles make setup and teardown much more manageable than heavier alternatives. Always remember to sand the edges of plywood and secure all connections between floor sections to eliminate tripping hazards that could interrupt your perfect day.
Essential Materials for Building a Sturdy Outdoor Dance Floor

Creating a robust outdoor dance floor requires exact materials that can withstand weather conditions while providing a smooth dancing surface. We’ve compiled the essential components you’ll need to build a dance floor that will impress your wedding guests.
Base Layer Options
The foundation of your outdoor dance floor is crucial for stability and safety. Firm tiles such as Matrax Light Duty Pedestrian Composite Mats create an excellent solid foundation when placing your dance floor over grass, dirt, sand, or gravel. These specialized mats distribute weight evenly and prevent sinking, ensuring dancers remain stable throughout the celebration.
For structural support, 2×2s or 2×4s lumber pieces form the frame that holds everything together. Plywood sheets (typically ¾-inch thickness) serve as the primary flooring surface, providing both rigidity and a smooth base for the decorative top layer.
Surface Material Choices
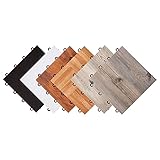
The visible portion of your dance floor deserves careful consideration as it impacts both aesthetics and functionality. Cherry, maple, dark oak, light oak, and walnut are popular wooden finishes that provide elegant looks with different color tones to match your wedding theme. These materials can be installed as actual hardwood or as laminate alternatives that offer similar appearance at lower costs.
Budget-Friendly Material Options
Wedding expenses add up quickly, so cost-effective dance floor answers are always welcome. Wooden pallets represent an excellent repurposing opportunity, creating a rustic and characterful dance surface that’s remarkably inexpensive. With proper cleaning, sanding, and sealing, these industrial castoffs transform into charming platforms with authentic vintage appeal.
Plastic mats offer another affordable alternative for the base layer of your dance floor. These flexible, easy-to-assemble mats interlock seamlessly and adapt well to slightly uneven terrain. Their lightweight nature makes transportation and setup manageable for DIY projects, while their durability ensures they’ll last throughout your celebration.
Tools You’ll Need for Construction
Building your dance floor requires exact tools to ensure proper assembly and safety. A quality drill becomes essential for connecting lumber pieces and securing floor panels. An impact driver complements this by efficiently driving screws into denser materials without stripping heads.
Accurate measurements prevent wasted materials and ensure your dance floor fits the designated space, making a tape measure an indispensable tool. For cutting wood to precise dimensions, a circular saw delivers clean, straight cuts through plywood and framing lumber.
Safety should never be compromised during construction. Safety glasses protect your eyes from wood chips and debris, while work gloves shield your hands from splinters and abrasions during handling of raw materials. These protective items represent a small investment that prevents potential injuries during your DIY project.
Step-by-Step Guide to Building a Wooden Pallet Dance Floor

A wooden pallet dance floor offers a charming, rustic aesthetic while being budget-friendly for your outdoor wedding celebration. We’ve broken down this DIY project into manageable steps to help you create a memorable space for your first dance and reception festivities.
Preparing and Leveling the Ground
- Select an ideal location for your dance floor on a relatively flat area of grass, dirt, sand, or gravel that’s close to your reception space.
- Clear the chosen area thoroughly by removing rocks, sticks, and debris that could create uneven spots under your dance floor.
- Measure and mark the perimeter where your dance floor will be placed using stakes and string to ensure proper alignment.
- Create a stable foundation by laying firm tiles or composite mats like Matrax over the ground surface. These materials distribute weight evenly and provide excellent stability over uneven terrain.
- Check for levelness throughout the base area using a long level tool. Address any important dips or bumps by adding or removing soil as needed.
- Apply weed barrier fabric underneath your foundation if placing directly on grass or soil to prevent vegetation growth during your event.
Assembling and Securing the Pallets
- Gather quality wooden pallets that are uniform in size and free from damage, splintering, or protruding nails. The number needed depends on your desired dance floor size.
- Clean and prepare each pallet by removing any loose boards, sanding rough edges, and treating the wood with a weatherproof sealant if desired.
- Arrange the pallets in your desired configuration, placing them side by side to form a continuous platform. For optimal strength, alternate the direction of every other row.
- Connect adjacent pallets using 3-inch wood screws and brackets at multiple connection points. This creates a solid, unified structure that won’t shift during dancing.
- Reinforce the underside of the pallets with additional support boards where needed, especially at junction points between pallets.
- Install the dance surface by laying sheets of plywood or vinyl flooring across the top of your secured pallets. This provides a smooth, splinter-free surface for dancing.
- Secure the top surface to the pallets using screws placed every 12 inches along the pallet frame below. Countersink these screws to ensure a flush surface.
- Address any edges by adding skirting boards or decorative trim around the perimeter to create a finished look and prevent tripping hazards.
- Test the stability of your completed dance floor by having several people walk and bounce on different areas to identify and fix any weak spots before the wedding day.
Creating a Portable Interlocking Tile Dance Floor System

Interlocking tile systems offer one of the most practical DIY answers for outdoor wedding dance floors. These modular designs create a stable surface that can be installed and removed quickly without professional help.
Benefits of Modular Dance Floor Designs
Portable dance floor systems provide exceptional versatility for outdoor weddings. Modular designs like Matrax Light Duty Pedestrian Composite Mats connect via pins for easy DIY assembly, requiring no adhesives while creating a weather-resistant surface that stands up to heavy foot traffic. These systems offer remarkable portability, allowing you to disassemble and store the tiles for future events or even reuse them for other occasions.
Cost-efficiency represents another important advantage, as DIY interlocking systems eliminate the need for professional installation services that can quickly inflate your wedding budget. Safety concerns are effectively addressed with these stable bases that prevent guests from tripping on uneven terrain while also protecting them from mud and gravel beneath. Many couples appreciate the customization options available with modular floors, which can be arranged in attractive patterns like checkerboard or even stained to complement your wedding theme.
Installation and Breakdown Tips
Planning the layout properly stands as the first crucial step when installing your modular dance floor. Allocate approximately 9-12 square feet per dancer, keeping in mind that typically one-third of attendees will dance simultaneously. Ground preparation makes a important difference in your floor’s stability—always level the area before beginning installation to ensure a smooth dancing surface.
For tile systems, ensure connectors snap together tightly to prevent shifting during use. When working on slopes or uneven areas, use sandbags or stakes to secure the edges and prevent movement. During installation, consider numbering your panels or tile sections according to a diagram, which will make teardown remarkably more efficient. This organizational approach allows you to quickly disassemble the floor after the event and store components in a logical order for future use. The simplicity of breaking down these systems represents one of their greatest advantages compared to more permanent dance floor options.
Weather-Proofing Your DIY Outdoor Wedding Dance Floor

Creating a dance floor that withstands the elements is crucial for your outdoor wedding celebration. Weather-proofing ensures your DIY dance floor remains safe and functional regardless of weather conditions.
Moisture Barriers and Drainage Answers
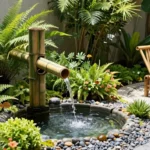
Elevating your dance floor is essential to prevent water damage and ensure stability during your celebration. A raised base keeps the floor away from damp ground and allows air circulation underneath, significantly reducing moisture buildup. You’ll want to incorporate permeable tiles with drainage channels that help water runoff, preventing puddles from forming on your dance surface.
Firm composite mats offer an excellent solution, as they allow water to drain through strategically placed gaps. These specialized tiles create a barrier between the ground and your dance floor, protecting dancers from mud and moisture. For additional protection, consider laying a waterproof tarp underneath your entire structure before installation.
Canopy and Covering Options
Installing a tent or canopy directly over your dance floor provides crucial protection from unexpected rain showers and harsh sunlight. This overhead covering ensures your celebration continues uninterrupted regardless of weather changes. Portable awnings positioned around the perimeter create additional sheltered areas while maintaining the open-air feel of your outdoor wedding.
For a more budget-friendly approach, consider using weatherproof fabric panels that can be quickly deployed if rain threatens. Strategically placed umbrellas or sail shades can also offer stylish protection while complementing your wedding décor. Remember that your covering should extend slightly beyond the dance floor edges to prevent water from running onto the surface during rainfall.
When selecting materials for your DIY outdoor dance floor, prioritize waterproof options like treated plywood with vinyl overlays. Apply a weatherproof coating to wooden elements, creating a moisture-resistant barrier that prolongs the life of your dance floor. Sturdy framing made from pressure-treated lumber provides the structural support needed to keep your floor level and secure throughout your celebration.
Adding Personal Touches to Your Dance Floor

Once you’ve constructed your DIY outdoor wedding dance floor, it’s time to transform it from functional to fabulous with personalized details that reflect your unique style as a couple.
Creative Lighting Installations
String lights create an enchanting atmosphere for your outdoor dance floor while defining the dance area for your guests. Hanging Edison bulbs or fairy lights from above draws attention to your dance space and provides the perfect illumination for those romantic evening moments. Lanterns placed strategically around the perimeter offer both decorative appeal and functional lighting that guides guests to the celebration spot. Solar-powered pathway lights can line the edges of your dance floor for an eco-friendly option that requires no electrical connections. LED tape lights secured under the edge of raised dance floors produce a magical floating effect that will impress your guests as darkness falls. For maximum impact, consider programmable RGB lights that can change colors throughout the reception to match different phases of your celebration.
Custom Floor Decorations and Monograms
Vinyl decals featuring your initials or wedding date transform an ordinary dance floor into a personalized keepsake. These temporary adhesives can be applied directly to plywood or other smooth surfaces and removed after the celebration. Paint stencils offer another approach for adding custom designs to your dance floor, allowing you to incorporate meaningful symbols or patterns that complement your wedding theme. Custom overlays placed at the center of your dance floor create an elegant focal point for those important first dance photos. Flower petals arranged in decorative patterns provide a natural, romantic touch that can be refreshed throughout the event. We’ve found that applying a clear sealant over painted designs helps protect your artistic efforts from foot traffic and potential weather changes. Monogrammed floor projections offer a high-tech alternative that creates stunning visual effects without permanently altering your dance surface. Remember that these personalized elements will appear in countless wedding photos, making them worth the extra investment of time and creativity.
| # | Preview | Product | Price | |
|---|---|---|---|---|
| 1 |

|
Digging In | $3.99 | Buy on Amazon |
Last update on 2026-02-27 / Affiliate links / Images from Amazon Product Advertising API
Budget-Friendly Alternatives to Building from Scratch

Creating a dance floor doesn’t always require building from scratch. We’ve gathered several cost-effective alternatives that deliver beautiful results without very costly.
Renting vs. DIY Cost Comparison
Renting a dance floor for your outdoor wedding can cost approximately $300 for just a few hours, a important expense particularly for smaller celebrations. DIY options typically offer substantial savings when compared to rental prices. Building your own floor using pallets or installing temporary base layers dramatically reduces your overall wedding costs. Many couples find that materials for a DIY dance floor can be sourced at a fraction of rental fees, with the added benefit of customization possibilities. The return on investment becomes even more apparent for larger dance areas where rental costs would multiply based on square footage.
Upcycling Materials for Eco-Friendly Options
Pallets represent one of the most versatile upcycling options for creating an eco-friendly dance floor. These readily available wooden platforms can be arranged in patterns and secured together for a rustic yet functional dancing surface. Composite mats like Matrax Light Duty Pedestrian Composite Mats offer another sustainable solution, providing durability and simple installation for outdoor settings. Repurposed wood sheets transform into sturdy, environmentally conscious flooring options that reduce waste while creating a beautiful dance space.
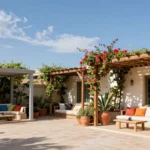
For those seeking minimal construction, defining a dancing area on grass with strategic lighting and decorations creates an instant dance floor without any building required. Hay bales arranged around the perimeter complement this approach perfectly for rustic-themed weddings, adding both functional seating and aesthetic appeal without extensive construction efforts.
Safety Considerations for DIY Dance Floors

When creating your outdoor wedding dance floor, safety should be your top priority to ensure guests can enjoy themselves without incident. We’ve compiled essential safety measures to incorporate into your DIY project.
Non-Slip Surfaces
Using shock-absorbent, non-slip materials is crucial for reducing injury risks at your outdoor wedding. Professional-grade polypropylene tiles or foam-backed flooring systems provide excellent traction even in damp conditions. Avoid makeshift answers like shower pan liners, which quickly degrade under sunlight exposure and become serious hazards. Surface traction becomes especially important if your wedding might experience morning dew, light rain, or spilled drinks that could make the dance floor slippery.
Edge Treatments and Transition Ramps
Installing proper transition ramps or beveled edges between your dance floor and the surrounding ground eliminates dangerous tripping hazards. These transitions are particularly important for elderly guests and anyone wearing high heels. Secure the perimeter edges of your dance floor with weighted bases if you’re using modular tiles to prevent them from shifting during enthusiastic dancing. Non-slip adhesives can also help maintain the integrity of your floor edges throughout the celebration, ensuring everyone can safely step on and off the dance area.
Weight Capacity and Structural Support
Selecting tiles or panels rated for high traffic is essential when planning your DIY dance floor. Durable polypropylene options typically offer the best combination of strength and flexibility for outdoor wedding use. For installations on grass, dirt, or uneven terrain, interlocking tiles with a rigid subfloor will distribute weight evenly and prevent unexpected shifting during the reception. Always verify manufacturer load limits before purchasing materials to ensure your floor can accommodate your guest count—plan for approximately 30-40% of attendees dancing simultaneously at peak times.
Ground Preparation and Compliance
Thoroughly level the ground before installing your DIY dance floor to create a stable foundation. This preparation step eliminates uncomfortable dips or rises that could cause guests to stumble. Choose professional-grade materials over budget alternatives whenever possible, as this investment significantly reduces potential liability risks. Local safety standards for temporary structures may apply to larger dance floors, so checking compliance requirements with your venue or local authorities can prevent last-minute complications on your wedding day.


Last update on 2026-02-27 / Affiliate links / Images from Amazon Product Advertising API
Post-Wedding Repurposing Ideas for Your DIY Dance Floor

After your special day has passed, your DIY dance floor doesn’t need to gather dust in storage. We’ve compiled several creative ways to give your handcrafted dance floor a second life, making your initial investment even more worthwhile.
Transform Into Home Improvements
Your DIY dance floor can easily become a valuable addition to your home. Wooden components from pallet or plywood dance floors make excellent materials for outdoor decks or patios, extending your living space while preserving memories of your celebration. The sturdy plywood sheets can also be repurposed into shelving, storage answers, or even custom furniture pieces that carry sentimental value.
Create Community Connections
Consider donating your dance floor materials to local organizations that could benefit from them. Schools, community centers, and nonprofit groups often welcome such contributions for their events and activities. Alternatively, you might offer the assembled floor for community events or fundraising activities, supporting local festivals or charity functions while sharing your creation with others who will appreciate it.
Practical Home Applications
The versatile materials used in DIY dance floors have many practical applications around your home. Interlocking tiles or mats make excellent garage or workshop flooring, protecting concrete from stains while providing comfort underfoot. Wooden sections can be converted into garden pathways, raised planting beds, or compost bins, bringing new life to your outdoor spaces.
Children’s Play Areas
If you used mat-based flooring or softer materials, these components make perfect surfaces for children’s play areas. The shock-absorbing qualities that made them ideal for dancing also provide safe spaces for little ones to play. Many couples find this particularly meaningful as they transition from newlyweds to parents, with their dance floor evolving alongside their family journey.
Seasonal Outdoor Entertaining
Your dance floor can become the foundation for seasonal outdoor entertaining spaces. During summer gatherings, reassemble sections to create designated areas for barbecues, outdoor dining, or yard games. The level, stable surface that worked so well for your wedding reception continues to enhance your outdoor living throughout the years.
By repurposing your DIY dance floor, we ensure that the materials, effort, and memories invested in this special element of your wedding continue to bring value long after the celebration ends. This sustainable approach transforms a temporary wedding feature into a lasting part of your new life together.
Common Mistakes to Avoid When Creating Your Outdoor Wedding Dance Floor
Creating your DIY outdoor wedding dance floor isn’t just budget-friendly and personalized—it’s a chance to create unforgettable memories. We’ve walked you through materials selection leveling techniques lighting options and important safety considerations to ensure your special day goes smoothly.
Remember that proper planning is key. Allow sufficient time for construction test your dance floor before the big day and always prioritize safety with stable connections and weather protection. With these tips you’ll avoid common pitfalls while creating a dance floor that perfectly complements your outdoor wedding vision.
The effort you put into your DIY dance floor will pay off when you see your guests dancing under the stars on a surface you crafted with love. It’s more than just a place to dance—it’s where beautiful wedding memories will be made.
Frequently Asked Questions
How much does it cost to build a DIY outdoor wedding dance floor?
The cost varies based on materials and size, but typically ranges from $100-$500 for budget options like wooden pallets or interlocking deck tiles, to $500-$1,500 for more elaborate designs using composite decking or vinyl overlays. This represents significant savings compared to professional dance floor rentals, which can cost $1,000-$2,500 for a standard-sized floor.
What size dance floor do I need for my wedding?
Allow approximately 4-5 square feet per dancing couple. For a wedding with 100 guests, assume about 30-40% will dance simultaneously, meaning you’ll need approximately 120-200 square feet of dance space. A 12×12 foot floor (144 square feet) works well for most medium-sized weddings, while larger celebrations may require 16×16 feet or more.
What are the easiest DIY dance floor options for beginners?
Interlocking deck tiles are the most beginner-friendly option. They require no special tools, snap together easily, and can be installed in hours. Artificial turf areas and indoor-outdoor carpet tiles are also straightforward options requiring minimal construction skills. Wooden pallet floors, while more involved, remain accessible for those with basic DIY experience.
How do I weatherproof my outdoor dance floor?
Elevate your dance floor several inches above ground level to prevent water accumulation. Use treated lumber and weatherproof materials like sealed plywood with vinyl overlays. Consider installing a tent or canopy above the floor for protection from rain and sun. Choose materials with drainage capabilities, and apply waterproof sealants to all wooden surfaces before and after construction.
Can I build a dance floor on uneven ground?
Yes, but it requires additional preparation. Start by excavating high spots and filling low areas with compacted gravel or sand. Use adjustable deck supports or shims to create a level foundation. Composite decking sections work well on slightly uneven terrain as they can be individually adjusted. For seriously uneven ground, consider building a raised platform with proper structural support.
How long does it take to build a DIY dance floor?
Construction time varies by design complexity and experience level. Simple options like interlocking tiles can be completed in 2-4 hours. Wood pallet floors typically require 1-2 days for preparation, construction, and finishing. More elaborate designs using composite decking or custom painted surfaces may take 2-3 days to complete. Allow additional time for ground preparation and unexpected challenges.
What tools do I need to build a wedding dance floor?
Essential tools include a drill with bits, impact driver, tape measure, level, circular saw, hammer, pry bar (for pallets), safety gear, and weather-appropriate sealants. For more complex designs, you might need a miter saw, orbital sander, and framing square. Many home improvement stores offer tool rentals if you don’t own these items.
How do I ensure my DIY dance floor is safe?
Use non-slip surfaces or treatments on the top layer. Install proper edging or transition ramps to prevent tripping. Ensure all components are securely fastened with no protruding nails or screws. Test the floor’s stability before the event with several people dancing simultaneously. For evening events, incorporate adequate lighting around and possibly within the floor’s design.
Can I personalize my DIY wedding dance floor?
Absolutely! Add custom stenciled designs, monograms, or meaningful quotes with paint or vinyl decals. Incorporate string lights or LED strips within or around the perimeter. For wooden floors, consider wood burning techniques for personalized details. Flower petals, greenery borders, or projected light patterns can also create unique aesthetics without permanent modifications.
What can I do with the dance floor after the wedding?
Repurpose components for home projects like garden pathways, deck expansions, or outdoor entertaining spaces. Donate materials to community centers, schools, or theater groups. Sell components to recoup costs or offer to another engaged couple. Some couples keep a small section as a memento, transforming it into coffee table tops or wall art to commemorate their special day.