Transforming your backyard into a stunning outdoor oasis doesn’t have to expensive or require constant maintenance. Rock landscaping offers the perfect solution for homeowners who want to create dramatic visual impact while reducing water usage and upkeep demands. We’ve discovered that incorporating natural stone elements can instantly elevate any outdoor space from ordinary to extraordinary.
Whether you’re dealing with challenging terrain, seeking low-maintenance alternatives to traditional grass lawns, or simply wanting to add texture and dimension to your industry design, rocks provide endless creative possibilities. From elegant river rock pathways to bold boulder focal points, these versatile materials work beautifully in any climate and complement virtually every architectural style.
We’ll share our favorite rock landscaping ideas that’ll help you create a backyard retreat that’s both functional and visually striking. These proven techniques will transform your outdoor space into a year-round masterpiece that requires minimal maintenance while delivering maximum curb appeal.
Create a Stunning Rock Garden Foundation
Building a solid foundation sets the stage for a rock garden that’ll thrive for years to come. We’ll guide you through the essential steps to create the perfect base for your stunning stone industry.
Choose the Right Base Materials
Decomposed granite forms the ideal foundation layer for most rock garden installations. This material compacts well while still allowing proper water drainage through your garden bed. We recommend spreading a 2-3 inch layer of decomposed granite as your primary base material.
Crushed gravel provides excellent drainage properties when mixed with decomposed granite at a 60/40 ratio. Angular gravel pieces lock together better than rounded stones, creating a more stable foundation. Choose gravel sizes between 1/4 inch and 3/8 inch for optimal compaction results.
Sand works well as a leveling agent on top of your gravel base but shouldn’t comprise more than 20% of your foundation mix. Coarse sand drains better than fine sand and won’t wash away during heavy rainfall. We avoid using construction sand since it contains clay particles that can create drainage problems.
Industry fabric prevents weeds from growing through your rock garden while allowing water to pass through freely. Install this barrier directly over your prepared soil before adding any base materials. Choose permeable industry fabric over plastic sheeting to maintain proper soil aeration.
Prepare Your Soil for Optimal Drainage
Test your existing soil drainage by digging a 12-inch deep hole and filling it with water. Well-draining soil absorbs the water within 4-6 hours, while clay-heavy soil may take 24 hours or longer. We recommend conducting this test in multiple spots across your planned rock garden area.
Amend clay soil with coarse sand and organic compost to improve drainage capabilities. Mix one part coarse sand and one part compost with two parts existing soil for optimal results. This amendment ratio prevents the creation of concrete-like soil that can occur when fine sand mixes with clay.
Create drainage channels by digging shallow trenches that slope away from your rock garden toward natural drainage areas. These channels should be 6-8 inches deep and filled with gravel to direct excess water away from plant roots. Position drainage channels every 8-10 feet in areas with poor natural drainage.
Install French drains in particularly problematic areas where water tends to pool after rainfall. Dig trenches 12-18 inches deep and 6 inches wide, then fill with perforated drainage pipe surrounded by gravel. Cover the gravel with industry fabric before adding your final soil layer to prevent clogging.
Design a Natural Stone Pathway
 1")
Natural stone pathways create stunning focal points that seamlessly connect different areas of your backyard industry. We’ll guide you through selecting the perfect stones and planning a layout that enhances both beauty and functionality.
Select Complementary Stone Types
River rocks deliver the most versatile foundation for natural stone pathways with their smooth, rounded edges creating an organic feel throughout your industry. These stones come in various sizes from small pea gravel to larger decorative pieces that work perfectly together.
Combining different sizes and colors transforms ordinary walkways into visually striking features that complement your existing industry design. We recommend pairing tan pea gravel with gray stones and incorporating large pavers to create attractive texture variations.
Granite slabs serve as excellent stepping stones or pathway borders that provide structure while maintaining the natural aesthetic. Natural stone slabs can be strategically placed to complement gravel or river rock beds, creating defined walking surfaces that blend seamlessly with softer materials.
Stone selection should consider both visual appeal and practicality, with harder stones like granite offering durability for high traffic areas while softer river rocks provide comfortable walking surfaces for casual garden strolls.
Plan Your Walkway Layout
Pathway shape determines the overall feel of your industry design, with curved paths offering soft, organic movement while straight paths provide formal, modern appeal. We suggest measuring and marking your intended path area precisely to visualize the final layout before beginning installation.
Flow of movement should guide your planning process, ensuring pathways connect naturally between garden beds, patios, and other landscaping elements. Consider how family members and guests will move through the space when determining width and direction.
Dividers maintain neat appearances by separating different materials, such as keeping mulched planting beds distinct from gravel paths. This separation prevents materials from mixing and creates clean, professional looking boundaries.
Sloped yards with drainage concerns benefit from incorporating dry river beds using different sizes of river rock for both stabilization and beauty. These features add functional drainage answers while improving the natural stone pathway’s visual appeal.
Greenery integration softens hardscape elements and adds essential contrast to stone pathways. We recommend planting alongside walkways to create balance between natural stone materials and living industry elements.
Build Decorative Rock Retaining Walls
 2")
Rock retaining walls transform sloped backyards into functional terraced spaces while adding striking architectural interest. These versatile structures solve drainage issues and create perfect planting areas for our landscaping projects.
Determine Wall Height and Placement
Planning your wall’s location requires careful consideration of your yard’s natural slope and drainage patterns. We recommend measuring the elevation changes across your property to identify areas where terracing will provide maximum benefit. Shorter walls between 2-3 feet work beautifully as garden borders and planting bed edges. Taller structures reaching 4-6 feet create dramatic terraces that can accommodate raised garden beds or seating areas.
Drainage assessment becomes crucial when selecting wall placement since water runoff affects both stability and longevity. We always examine how water flows during heavy rains to position walls where they’ll redirect moisture effectively. Consider placing walls to create level planting zones that prevent soil erosion while establishing natural gathering spaces throughout your backyard design.
Choose Between Dry Stack and Mortared Options
Dry stack construction offers incredible versatility and natural beauty without requiring mortar or concrete. We love this method because the stones rely on their own weight and careful fitting to create stable structures. This technique allows excellent water drainage through the gaps between stones, preventing hydrostatic pressure that could damage the wall. Repairs become straightforward since we can easily remove and replace individual stones when needed.
Mortared walls provide maximum stability and permanence for taller retaining structures or areas requiring extra support. We use mortar to bind stones together, creating solid barriers that can handle greater soil pressure and weight loads. This construction method works best for walls exceeding 4 feet in height or locations where absolute stability is paramount. The trade off involves reduced drainage capability, so we must install proper drainage systems behind mortared walls to prevent water buildup.
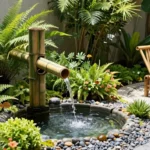
Install a Beautiful Rock Water Feature
 3")
Adding a rock water feature to your backyard creates a stunning focal point that enhances your outdoor space’s natural beauty. The soothing sounds of flowing water transform any industry into a peaceful retreat.
Design a Rock Waterfall or Stream
Creating a cascading waterfall begins with selecting rocks of various sizes to simulate natural water flow patterns. We recommend stacking larger boulders at the base and gradually transitioning to smaller stones as you build upward. This technique ensures water flows naturally and creates those relaxing sounds we all love.
Integrating your waterfall into existing terrain works best when you use natural slopes or garden beds. Position your rock arrangement to follow the land’s contours, which makes the feature appear as if it’s always been part of your industry. Native plants along the edges add lush greenery that complements the stone elements.
Attracting wildlife becomes an added benefit when you design your stream properly. Birds will visit regularly to drink and bathe, while the gentle water movement creates a ever-changing network in your backyard. Choose river rocks and smooth stones that won’t disrupt the water’s flow patterns.
Create a Stone Fountain Centerpiece
Selecting the perfect stone basin depends on your backyard’s overall design theme and available space. We suggest granite or sandstone options that can withstand weather conditions while maintaining their visual appeal. These materials offer durability and come in various colors to match your existing industry.
Positioning your fountain strategically ensures it becomes the centerpiece it’s meant to be. Place it where multiple sightlines converge, such as at the intersection of pathways or in the center of a garden bed. This location maximizes the fountain’s impact while making it accessible for maintenance.
Improving the surrounding area with complementary elements elevates your fountain’s charm significantly. Consider installing subtle lighting that highlights the water movement during evening hours. Plant aromatic herbs or colorful perennials around the base to create a multi sensory experience that draws people to linger and enjoy the space.
Maintaining your stone fountain requires minimal effort compared to other water features. Clean the basin regularly to prevent algae buildup, and check the pump system monthly to ensure proper water circulation. These simple steps keep your fountain functioning beautifully year round.
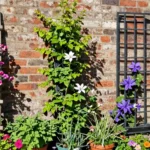
Establish Rock Borders and Edging
 4")
Rock borders and edging provide the perfect solution for creating clean, defined boundaries throughout your backyard industry. We’ll show you how strategic stone placement transforms chaotic yard areas into organized, professional-looking outdoor spaces.
Define Garden Beds with Stone Borders
Stone borders around garden beds create crisp separation between planted areas and other yard sections while adding natural texture and visual appeal. We recommend arranging stones in rows or stacking them for added height, depending on your design preference and functional needs.
Choose the right stone sizes to match your garden bed scale. River rocks work beautifully for curved borders, while larger angular stones provide structure for formal rectangular beds. Combining different sizes and colors increases visual interest and creates depth in your industry design.
Install industry fabric beneath your stone borders to prevent weeds from growing between rocks. This simple step maintains clean lines and reduces maintenance time throughout the growing season. The fabric also helps separate soil from decorative stones, keeping your border looking fresh.
Create containment for mulch and soil within your garden beds using properly sized border stones. Stones should sit slightly above ground level to effectively contain materials while allowing proper drainage. Low maintenance rock beds paired with drought tolerant plants or succulents provide a modern, clean appearance that’s perfect for sunny backyard areas.
Use Rocks to Separate Different Industry Zones
Rocks effectively delineate different functional zones in your backyard, creating visual organization while guiding movement throughout the space. We use strategic rock placement to separate seating areas from pathways, play zones from planting sections, and formal gardens from casual lawn areas.
Place rock borders between different garden types to minimize cross contamination of soil and mulch. For example, separating your vegetable garden from ornamental flower beds prevents nutrient competition and maintains distinct growing environments. This zoning approach also helps with drainage control across different industry areas.
Use larger rock groupings or boulders as focal points to anchor exact zones while smaller gravel creates clean transition paths between areas. Strategic boulder placement can define a meditation corner, frame a fire pit area, or mark the entrance to a garden pathway.
Apply industry marking paint before installation to visualize your zone boundaries and ensure proper spacing. This technique helps you plan rock placement for optimal flow and prevents overcrowding in smaller backyard spaces.
Consider maintenance access when planning your rock zone separators. Leave adequate space for lawn equipment, hose access, and foot traffic between different industry areas. Properly planned rock borders should enhance functionality rather than create obstacles in your outdoor space.
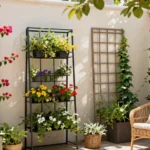
Plant a Low-Maintenance Rock Garden
 5")
Rock gardens serve as stunning focal points that require minimal upkeep while maximizing visual impact in your backyard. We’ll show you how to select the right plants and arrange them to create a thriving, sustainable industry.
Select Drought-Tolerant Plants for Rock Gardens
Drought-tolerant plants form the backbone of successful rock gardens because they thrive in dry conditions without frequent watering. Succulents lead our plant recommendations since they store water in their leaves and require minimal maintenance throughout the year. Ornamental grasses like fountain grass and blue fescue add texture and movement while surviving harsh weather conditions with ease.
Lavender brings both fragrance and purple blooms to your rock garden while attracting beneficial pollinators during growing season. Sedum varieties offer colorful foliage that changes with seasons and produces clusters of small flowers in summer and fall. Yucca plants create dramatic architectural elements with their sword-like leaves and tall flower spikes that emerge annually.
These plant selections reduce your watering needs by up to 70% compared to traditional lawn areas. Native plants in your region often provide the best drought tolerance since they’ve adapted to local climate conditions over thousands of years. We recommend choosing plants that complement your hardiness zone to ensure year-round survival without extra protection.
Arrange Plants to Complement Your Stone Features
Strategic plant placement enhances the natural beauty of your stone elements while creating visual balance throughout the space. Position smaller plants like hens and chicks between rocks to soften hard edges and add pops of green color. Cluster taller plants such as ornamental grasses near the edges of your rock garden to create height variation and natural boundaries.
Large boulders serve as anchor points where you can place specimen plants that draw attention and create focal areas. Place trailing plants like creeping phlox along rock edges to cascade naturally and blur the transition between stone and soil. Group plants with similar water needs together to simplify irrigation and ensure each species receives appropriate care.
Color coordination between plants and rocks creates cohesive design that feels intentional rather than random. Silver-leafed plants like dusty miller complement gray stones beautifully while purple flowers enhance warm-toned sandstone features. We suggest using odd-numbered groupings of three or five plants to create more natural, visually pleasing arrangements than even-numbered clusters.
Consider mature plant sizes when spacing to prevent overcrowding as your garden establishes over the first few growing seasons. Leave adequate space between plantings to showcase both the rock formations and individual plant characteristics without competition for visual attention.
Create Multi-Level Rock Terraces
 6")
Multi-level rock terraces transform sloped backyards into functional outdoor spaces while adding dramatic visual dimension. We’ll show you how to stack rocks strategically to create levels that enhance your industry’s natural beauty.
Design Terraced Garden Beds
Terraced garden beds combine rock retaining walls with planted areas to maximize your backyard’s growing potential. We recommend forming curved shapes for a natural aesthetic or geometric lines for modern appeal, depending on your desired industry style.
Plan your bed layout carefully by measuring and marking the perimeter before installation begins. Remove all debris from the designated area and prepare soil behind each rock wall to support healthy plant growth throughout the seasons.
Create different planting zones by varying the height and depth of each terrace level. Upper terraces work perfectly for drought-tolerant plants like succulents and ornamental grasses, while lower levels accommodate plants requiring more moisture and nutrients.
Incorporate various rock textures and colors to highlight your planted areas and create visual contrast throughout the design. Large, flat stones form excellent borders between different plant zones, while smaller decorative rocks can accent exact garden features.
Consider sun exposure patterns when planning each terrace level, as different elevations receive varying amounts of sunlight throughout the day. This natural variation allows you to create diverse microclimates perfect for different plant species.
Build Stable Rock Retaining Systems
Building stable rock retaining walls requires careful attention to foundation work and proper stacking techniques. We start with large, flat rocks at the base to provide maximum stability for the entire structure.
Stack rocks tightly together by interlocking them to prevent shifting over time and weather changes. Each rock should fit snugly against its neighbors, creating a solid wall that can withstand soil pressure and water runoff.
Backfill behind rocks with gravel to enhance drainage and reduce hydrostatic pressure against the wall structure. This drainage layer prevents water buildup that could destabilize your retaining system during heavy rainfall or irrigation.
Install industry fabric behind walls to prevent soil erosion while allowing water to pass through freely. This fabric barrier keeps fine soil particles from washing through rock gaps while maintaining proper drainage flow.
Incorporate steps or shelves within your rock walls to create visual breaks and additional planting opportunities. These features add functionality to your retaining system while breaking up large wall expanses for better aesthetic appeal.
Use proper wall height ratios to ensure long-term stability, with taller walls requiring wider bases and more substantial rock materials. Walls exceeding three feet in height benefit from professional engineering consultation to guarantee safety and durability.
Add Accent Boulders and Statement Stones
 7")
Strategic placement of accent boulders transforms any ordinary backyard into a captivating industry design. We’ll show you how to create stunning focal points that anchor your entire rock garden layout.
Position Large Rocks as Focal Points
Start by positioning large rocks strategically throughout your backyard to serve as main anchors in your design. These substantial stones draw attention effectively and structure the entire space with their commanding presence. We recommend placing your biggest boulders first to define exact areas before filling around them with smaller rocks or gravel.
Draw the eye naturally by using these statement stones as visual anchors that guide movement through your industry. Position them at key viewpoints like patio corners, garden entrances, or along pathways where they’ll create maximum impact. Each boulder should feel intentional rather than randomly placed, contributing to the overall flow of your outdoor space.
Define different zones in your backyard by using accent boulders as natural dividers between functional areas. Place larger stones to separate your rock garden from lawn areas, create intimate seating nooks, or establish boundaries around water features. This strategic positioning helps organize your industry while maintaining an organic, natural appearance.
Balance Stone Sizes Throughout Your Design
Use a mix of large boulders as focal points with medium to small stones around them to maintain visual harmony. This layering technique adds essential depth and texture while preventing any single element from overwhelming your industry design. We’ve found that combining different stone sizes creates the most natural and appealing rock garden layouts.
Leave adequate room for plants to grow between stones to soften the ruggedness and integrate greenery seamlessly. Strategic spacing allows your chosen drought tolerant plants to thrive while creating beautiful contrast against the stone elements. This approach prevents your rock industry from feeling too harsh or artificial.
Select rocks with similar color palettes and shapes to avoid a cluttered appearance throughout your design. Opt for larger rocks in lighter hues to prevent your backyard from feeling heavy or dark, while using complementary colors in smaller stones for appealing visual interest. Use stretches of the same material rather than mixing too many different types of rocks in one area.
Incorporate Gravel and Pebble Ground Cover
 8")
We recommend using gravel and pebbles as ground cover because they create a practical alternative to traditional lawns while offering superior water drainage and weed prevention. This approach requires minimal upkeep compared to grass or mulch, making it perfect for busy homeowners seeking low maintenance rock landscaping answers.
Choose Appropriate Gravel Colors and Sizes
Light colored gravels like white or tan work exceptionally well in shady areas of your backyard, creating brightness while contrasting beautifully with darker plants or existing rock features. We suggest using these lighter tones to illuminate spaces that don’t receive direct sunlight throughout the day.
Dark gravels deliver a more dramatic and modern aesthetic that complements contemporary outdoor designs. These deeper tones create striking visual impact when paired with architectural elements or structured plantings.
Mixing different sizes of gravel and pebbles adds dimensional interest to your ground cover design. We recommend combining quarter inch pebbles with larger river rocks or three quarter inch gravel to create natural looking patterns that guide visitors through your outdoor space.
Strategic color selection enhances the overall harmony of your backyard rock landscaping. Consider your home’s exterior colors and existing hardscape materials when choosing gravel tones to ensure a cohesive design flow.
Create Texture Contrast with Different Materials
Pairing smooth pebbles with rough cut flagstones or weathered boulders creates natural looking texture combinations that add visual depth to your industry design. We find this contrast particularly effective when transitioning between different functional areas of the backyard.
Incorporating drought tolerant plants like succulents or ornamental grasses softens the hard edges of rock features while adding color contrast throughout the seasons. These plant selections thrive in rocky terrain and require minimal watering once established.
Wood elements such as cedar fences or teak benches complement stone textures by introducing warmth and organic balance to your rock landscaping design. We suggest positioning these wooden features strategically to create comfortable gathering spots within your gravel covered areas.
Rock features like natural stone arches or sculptural obelisks provide vertical interest that enhances texture contrast in three dimensions. These artistic elements serve as focal points while maintaining the cohesive rock theme throughout your backyard design.
Gravel pathways can outline walkways and fill garden beds while serving as a base for decorative rock sculptures or water features. We recommend using different gravel sizes to create borders that visually separate planted areas from hardscaped zones.
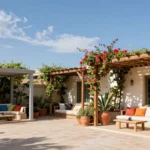
Design a Rock Fire Pit Area
 9")
Creating a rock fire pit area transforms your backyard into an inviting gathering space that combines natural beauty with functional warmth. We’ll show you how to build a stunning centerpiece that becomes the heart of your outdoor entertainment zone.
Build a Stone Fire Ring
Fire rings constructed with natural stone provide both safety and stunning visual appeal for your backyard retreat. We recommend using fire-resistant materials like sandstone, granite, or limestone to ensure durability and heat tolerance. Stack stones carefully in a circular pattern, maintaining a height between 12 to 24 inches to effectively contain flames while allowing proper airflow.
Stability becomes crucial when building your stone fire ring, so we suggest selecting stones with flat surfaces that fit together snugly. Fill any gaps between stones with smaller rocks or fire-resistant mortar to prevent safety hazards. Top your ring with flat flagstones to create convenient ledges for placing drinks, food, or additional seating surfaces.
Position your fire ring on a stable base of large natural stones or flagstones that can withstand high temperatures without cracking. Surround the immediate area with gravel or river rocks to define the space and provide additional heat resistance. This approach creates a professional appearance while ensuring your fire feature remains safe and functional for years of enjoyment.
Create Comfortable Seating Areas
Seating arrangements around your fire pit should encourage conversation and relaxation while complementing your stone design aesthetic. We suggest using flat boulders as natural benches, which provide weather-resistant seating that requires no maintenance. Stone seating walls built at comfortable heights of 16 to 18 inches work perfectly for larger gatherings.
Arrange your rock seating in a semi-circle formation around the fire ring to promote social interaction and ensure everyone feels included in conversations. Built-in stone benches offer permanent answers that blend seamlessly with your fire pit design. Add outdoor cushions and weather-resistant throws to enhance comfort without compromising the natural stone appearance.
Access to your seating area improves significantly when you incorporate rock pathways or stepping stones leading from your home to the fire pit zone. Connect different seating areas with crushed granite walkways that provide stable footing and visual continuity. These pathways also help define the space while making it easier for guests to navigate around your backyard fire feature safely.
Conclusion
Rock landscaping offers us an incredible opportunity to create stunning backyard spaces that combine beauty with practicality. We’ve explored many techniques that can transform any outdoor area into a low-maintenance retreat that stands the test of time.
From foundational rock gardens to striking water features and cozy fire pit areas each element works together to create a cohesive design. The versatility of stone allows us to adapt these ideas to our exact terrain and personal style preferences.
By implementing these proven strategies we can enjoy years of beautiful outdoor living with minimal upkeep. Our investment in quality rock landscaping will continue to enhance our property value while providing endless enjoyment for family and friends.
Frequently Asked Questions
What are the main benefits of rock landscaping in backyards?
Rock landscaping offers several key advantages including cost-effectiveness, low maintenance requirements, and reduced water usage. It enhances visual appeal with natural stone elements, works well with different terrains and architectural styles, and creates functional outdoor spaces that require minimal upkeep compared to traditional landscaping methods.
How do I prepare a solid foundation for a rock garden?
Start by building a base with decomposed granite for optimal drainage. Use crushed gravel and sand for stability, then install landscape fabric to prevent weeds. Test your existing soil and create drainage channels as needed to ensure proper water flow through your rock garden foundation.
What types of stones work best for natural pathways?
River rocks are highly recommended for their versatility and aesthetic appeal. Combine various sizes and colors to enhance visual interest, and consider using granite slabs for added structure. Plan your walkway layout carefully, considering traffic flow and incorporating dividers for a neat, organized appearance.
How tall should rock retaining walls be for different purposes?
For garden borders, shorter walls work well, while taller structures create dramatic terraces. Assess your yard’s natural slope and drainage patterns to determine appropriate height. Consider your specific needs – decorative borders require less height than functional terracing for sloped areas.
What’s the difference between dry stack and mortared rock walls?
Dry stack walls offer versatility and excellent drainage, making them ideal for most backyard applications. Mortared walls provide maximum stability for taller structures but require proper drainage systems to prevent water buildup behind the wall, which could cause structural issues over time.
Which plants work best in low-maintenance rock gardens?
Drought-tolerant plants thrive in rock gardens, including succulents, ornamental grasses, lavender, sedum, and yucca. These plants require minimal water and upkeep while complementing stone features beautifully. Focus on plants that naturally thrive in dry, well-draining conditions for best results.
How do I create effective rock borders and edging?
Use river rocks for curved borders and larger stones for formal garden beds. Install landscape fabric underneath to prevent weeds. Strategically place boulders and gravel to create distinct functional zones while ensuring easy access for maintenance and lawn equipment movement.
What should I consider when adding a rock water feature?
Use various rock sizes to create natural flow and integrate the feature into existing terrain. For stone fountains, choose durable materials like granite or sandstone. Consider strategic placement for maximum visual impact and surround with complementary elements like lighting and aromatic plants.
How do I use gravel and pebbles effectively as ground cover?
Choose appropriate colors and sizes – light-colored gravels work well in shady areas while dark gravels create a modern aesthetic. Mix different sizes to create natural patterns and ensure superior drainage. Pair with drought-tolerant plants to soften hard edges and add visual interest.
What’s important when building a rock fire pit area?
Use fire-resistant materials and focus on stability and safety when building the stone fire ring. Create comfortable seating areas with natural stone benches and ensure proper pathways for accessibility. Consider the surrounding space and how it connects to other backyard features for optimal functionality.