Dreaming of a more inviting outdoor space? Pathway ideas can transform your property from ordinary to extraordinary while adding functionality and visual appeal. We’ve gathered the most stunning pathway designs that’ll guide you through creating the perfect walkway for your home.
Whether you’re looking for budget-friendly DIY answers or planning to invest in professional landscaping, the right pathway can dramatically enhance your curb appeal and create seamless transitions throughout your outdoor areas. From classic brick patterns to modern concrete designs, gravel paths to stepping stones, there’s a perfect pathway solution waiting for your unique space.
Let’s explore these inspiring pathway ideas that’ll help you navigate your outdoor transformation journey with confidence and style.
10 Stunning Pathway Ideas to Transform Your Outdoor Space
1. Classic Brick Pathways
Brick pathways offer timeless elegance that complements virtually any industry design. These durable routes can be installed in various patterns such as herringbone, basket weave, or running bond to create visual interest. Traditional clay bricks provide a warm, rustic appearance that ages beautifully over time. Many homeowners choose brick for its exceptional durability and relatively low maintenance requirements. You’ll find brick pathways particularly appealing if you have a colonial, cottage, or traditional style home where they enhance the architectural character.
2. Contemporary Concrete Designs
Modern concrete pathways have evolved far beyond plain gray slabs. Today’s concrete walkways feature stamped patterns, exposed aggregates, and colored finishes that mimic natural stone. Poured concrete offers exceptional design flexibility, allowing for curved paths and integrated lighting features. Homeowners appreciate concrete for its unmatched longevity and ability to withstand harsh weather conditions. These pathways work beautifully in contemporary landscapes where clean lines and minimalist aesthetics are desired.
3. Natural Stone Walkways
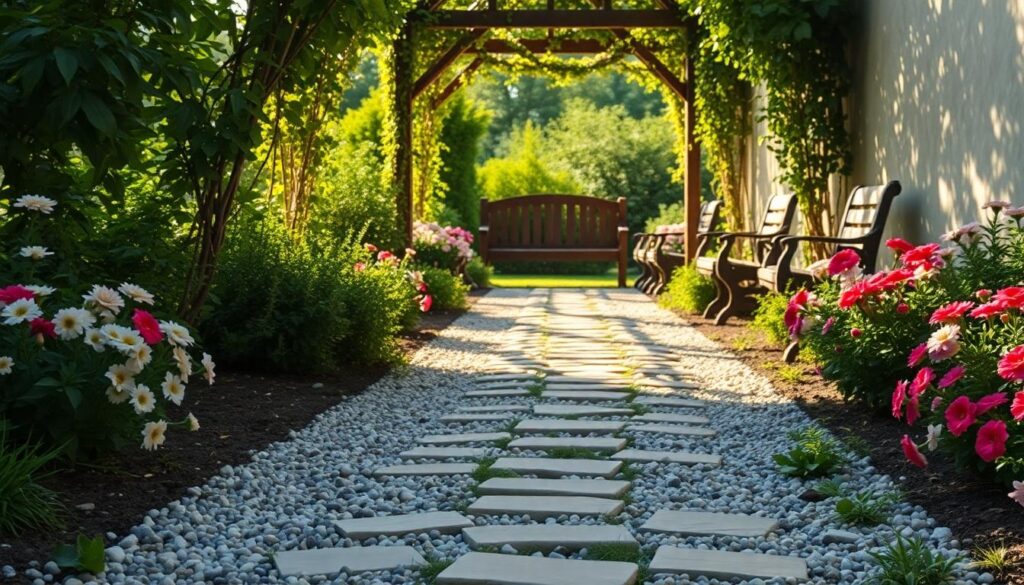
Stone walkways create an organic, timeless appeal that connects your industry to nature. Materials like flagstone, slate, limestone, and bluestone provide unique textures and color variations that can’t be replicated. Irregular stones can be arranged in mosaic-like patterns for artistic pathways that become focal points. Natural stone offers exceptional durability with minimal maintenance beyond occasional weeding between stones. These paths particularly shine in cottage gardens, woodland settings, or alongside water features.
4. Gravel and Crushed Stone Paths
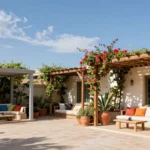
Gravel pathways provide excellent drainage and a satisfying crunch underfoot that many find appealing. Different stone options like pea gravel, crushed granite, or decomposed granite offer varying colors and textures. The installation process is relatively simple, making it an excellent DIY project for budget-conscious homeowners. Edging materials such as metal, stone, or wood help contain the gravel and define the path boundaries. These casual pathways work wonderfully in country gardens, Mediterranean landscapes, or xeriscaped yards.
5. Wooden Boardwalk Paths
Wooden walkways add warmth and architectural interest to outdoor spaces. Cedar, redwood, and pressure-treated pine offer natural resistance to decay in outdoor applications. Elevated boardwalks work particularly well in sloped yards, wet areas, or over delicate ground cover. The distinctive look creates a coastal or woodland retreat atmosphere that invites exploration. Wooden paths can incorporate built-in seating, planters, or deck lighting for enhanced functionality.
6. Stepping Stone Designs
Stepping stone paths create playful, whimsical routes through gardens and lawns. These versatile paths can use manufactured concrete pavers or natural stone slabs based on your aesthetic preferences. Spacing between stones can accommodate ground cover plants like creeping thyme or Irish moss for added visual interest. DIY enthusiasts often create custom stepping stones using concrete molds and decorative elements like shells, glass beads, or leaf imprints. These casual pathways work wonderfully in cottage gardens, family-friendly yards, or Japanese-inspired landscapes.
7. Mixed Material Combinations
Combining different materials creates distinctive pathways with unique character and visual interest. Popular combinations include brick borders with gravel centers, concrete with inlaid stone accents, or wood frames filled with pebbles. These hybrid approaches allow you to highlight transition areas between different garden zones or industry features. Homeowners appreciate how mixed material paths can incorporate leftover materials from other projects, reducing waste and cost. These creative walkways showcase your personal style while serving practical functions.
8. Permeable Paver Systems
Permeable pavers offer eco-friendly answers that allow water to penetrate through to the soil below. These specialized pavers help reduce runoff, replenish groundwater, and prevent erosion during heavy rainfall. Various styles mimic traditional brick, concrete, or natural stone while providing superior environmental benefits. Homeowners in areas with stormwater management regulations often find these systems particularly valuable. These sustainable pathways demonstrate environmental consciousness while maintaining aesthetic appeal.
9. Illuminated Path Designs
Lighting transforms ordinary walkways into magical nighttime features that enhance safety and ambiance. Solar-powered path lights offer easy installation without wiring and operate cost-effectively. LED strip lighting can be integrated into step risers, under benches, or along path edges for dramatic effects. Motion-activated systems provide security benefits while conserving energy when areas aren’t in use. These illuminated paths extend your outdoor enjoyment into evening hours while highlighting industry features after dark.
10. Living Garden Paths
Living pathways incorporate plants directly into the walking surface for truly unique garden experiences. Chamomile, thyme, woolly yarrow, and low-growing sedums create aromatic, cushioned surfaces between stepping stones. Moss paths thrive in shady, moist areas and create a lush, velvet-like carpet underfoot. Ground covers between pavers reduce weeding while adding color and texture to your walkway. These botanical pathways create sensory-rich experiences, releasing fragrance when stepped upon and attracting beneficial pollinators to your garden.
Creating Natural Stone Pathways for Timeless Appeal

Natural stone pathways offer the perfect blend of durability and timeless aesthetic appeal for any outdoor space. These versatile walkways can transform your industry with their organic textures and natural beauty, creating a perfect balance between functionality and visual interest.
Selecting the Right Stones for Your Climate
Climate considerations should guide your stone selection to ensure maximum longevity of your pathway. Granite stands out as an excellent choice for colder regions due to its impressive frost-resistant properties that prevent cracking during freeze-thaw cycles. In areas with high humidity, we recommend non-porous stones like quartzite that naturally minimize moss growth and maintain their appearance longer. Sandy or decomposed granite bases work exceptionally well in wet climates by improving drainage and preventing water accumulation. Compacted soil can provide a sufficient foundation in arid zones where moisture retention is less concerning. When designing your pathway, consider flat stones such as bluestone, slate, or limestone for a classic, refined appearance, while irregular flagstones create a more rustic, natural charm that complements casual garden settings.
Installation Tips for Stone Pathways
- Prepare the base properly – Start by excavating 4-6 inches of soil from your planned pathway area, then layer with compacted gravel followed by sand to create a stable foundation that prevents future settling.
- Level each stone carefully – Use a rubber mallet to adjust the height of individual stones, ensuring they create a flush surface that’s both visually appealing and safe to walk on.
- Consider spacing strategically – Leave 1-2 inch gaps between stones if you plan to grow grass or ground cover between them, or position them closer together and fill with polymeric sand for a more seamless appearance.
- Install edge restraints – Plastic or metal edging helps maintain your pathway’s integrity by preventing stones from shifting over time, especially in areas with freeze-thaw cycles.
- Plan for proper drainage – Grade your pathway slightly away from structures and use permeable materials to reduce runoff issues that could damage your industry or home foundation.
Curved pathway designs enhance organic landscapes by harmonizing with surrounding greenery and creating a natural flow through your outdoor space. For a more contemporary aesthetic, try pairing traditional stone pavers with black gravel or volcanic rock to add interesting texture and visual contrast. Remember that while gravel fills create beautiful pathways, they’re best suited for low-traffic areas as they require periodic maintenance to maintain their appearance.
Incorporating Wooden Walkways into Your Landscape Design

Wooden walkways offer a durable and aesthetically pleasing solution for connecting different areas of your outdoor space. They create natural pathways that guide visitors through gardens or along water features while adding warmth and architectural interest to your industry design.
Treated Lumber Versus Cedar Pathways
Treated lumber provides exceptional durability for pathway construction, standing up well against rot, moisture, and insect damage. This cost-effective option works well in most climate conditions but contains chemicals that might leach into surrounding soil over time. Many homeowners opt for treated lumber when building walkways that need to withstand heavy foot traffic or challenging weather conditions.
Cedar pathways represent a premium natural alternative that brings both beauty and functionality to your industry. Western Red Cedar earns its popularity through inherent resistance to decay and insects without chemical treatments. The distinct aroma and rich, warm tones of cedar create an inviting sensory experience for anyone traveling your garden paths. Cedar typically costs more upfront than treated lumber but requires less maintenance and offers environmental benefits that many find worth the investment.
Creative Wooden Pathway Patterns
Herringbone patterns transform ordinary wooden walkways into visually striking industry features. This classic design arranges wooden planks in a distinctive zigzag formation that adds texture and visual interest while creating a surprisingly strong structural foundation. Pathways designed with herringbone patterns draw the eye forward and can make garden spaces appear larger.
Mixed material combinations pair wood with complementary elements like stone, gravel, or concrete for truly unique pathway designs. Alternating wooden sections with stone pavers creates rhythm and visual breaks along the path. Framing wooden walkways with gravel borders enhances drainage while adding textural contrast that elevates the overall design.
Reclaimed wood pathways bring character and sustainability to your industry design. Repurposed pallet wood, weathered dock boards, or salvaged lumber each tell a story through their distinctive patinas and textures. These environmentally friendly options reduce waste while creating budget-conscious walkways with rustic charm that new materials simply cannot replicate. The irregular characteristics of reclaimed wood create pathways with distinct personality that improve with age.
Illuminating Your Pathways with Strategic Lighting

Proper lighting transforms ordinary pathways into stunning visual features while ensuring safety and accessibility after dark. Strategic illumination requires thoughtful planning that balances visibility with aesthetic appeal.
Solar-Powered Options for Eco-Friendly Pathway Lighting
Solar path lights offer an eco-friendly lighting solution that harnesses natural sunlight, eliminating complex wiring requirements and reducing ongoing energy costs. These sustainable fixtures store solar energy during daylight hours, then automatically illuminate your walkways from dusk till dawn thanks to built-in sensors. Most modern solar models feature efficient LED bulbs, providing significantly longer lifespans than traditional lighting options while delivering consistent illumination. When selecting solar pathway lights, we recommend prioritizing models with high-lumen output capabilities and weather-resistant construction to withstand various outdoor conditions. The versatility of solar lighting makes it ideal for gardens, driveways, and remote pathway areas where running electrical lines would be impractical or costly.
Creating Magical Evening Ambiance with Path Lights
Low-voltage LED fixtures produce warm, inviting tones that create a welcoming atmosphere perfect for residential pathways and garden settings. Strategic placement techniques, such as staggering lights at varying intervals, prevent the undesirable “airport runway” effect while ensuring even illumination throughout your walkway. Layered lighting approaches that combine ground-level path lights with uplighting for trees or architectural features add depth and visual interest to your industry. Selecting fixtures with decorative elements like lantern-style housings or copper finishes enhances the overall aesthetic appeal even when lights aren’t illuminated. Minimalist bollard lights or recessed floor lamps offer a contemporary solution that integrates seamlessly into modern industry designs without overwhelming the space. To prevent uncomfortable glare, we suggest choosing shielded fixtures that direct light downward, highlighting the pathway surface rather than shining into visitors’ eyes. Downlighting from elevated positions, core-drilled marker lights embedded directly into pathways, and specialized step lighting all contribute to both safety and style for a truly magical evening industry.


Last update on 2026-02-28 / Affiliate links / Images from Amazon Product Advertising API
Designing Budget-Friendly Gravel and Pebble Pathways

Gravel and pebble pathways offer excellent value for homeowners looking to enhance their outdoor spaces without very costly. These versatile materials provide both functionality and aesthetic appeal at a fraction of the cost of other options.
Budget-Friendly Gravel Pathway Ideas
- Pea Gravel Pathway – Create stunning garden walkways with pea gravel, priced affordably at just $1 to $3.15 per square foot. This economical option works perfectly for winding paths between garden beds, providing both visual interest and practical access.
- Decomposed Granite Pathway – Achieve a more polished, professional appearance with decomposed granite. Adding a stabilizer to this material creates a firmer surface that resists displacement and maintains its shape over time.
- Mixed Material Pathway – Combine different affordable materials like gravel, mulch, and crushed brick to design charming walkways with unique character. This approach allows you to use leftover materials from other projects, further reducing costs.
Drainage Answers for Gravel Pathways
- Sand Base Foundation – Install a 2-inch thick sand or stone pack base beneath your gravel to significantly improve drainage capability. This foundational layer prevents water pooling and creates a stable surface that extends the lifespan of your pathway.
- Inclined Design – Construct your pathway with a slight incline to naturally channel water away from the walking surface. Proper grading ensures rainwater runs off rather than collecting in puddles, keeping your path usable even after heavy rainfall.
- Strategic Placement – Position your gravel pathway to work with the natural drainage patterns of your industry. Observing how water flows through your yard during rainfall helps determine the optimal route for maximum drainage efficiency.
Edging Options to Contain Loose Materials
- Metal Edging – Frame your gravel path with sleek metal edging for a contemporary, clean-lined appearance. Metal options provide excellent containment while maintaining a minimalist profile that doesn’t detract from your industry design.
- Plastic Edging – Select budget-conscious plastic edging that effectively keeps gravel in place without a important investment. These affordable barriers come in various heights and styles to suit different design preferences.
- Brick or Stone Edging – Border your pathway with traditional brick or natural stone for a timeless, rustic charm. These sturdier materials not only contain loose gravel effectively but also add decorative elements that enhance the overall pathway design.
- Landscaping Tarp Underlayment – Place a landscaping tarp beneath your gravel to create a weed barrier that reduces maintenance requirements. While this solution may require replacement over time, it initially provides excellent protection against unwanted plant growth.
Blending Pathways with Garden Features

Thoughtfully designed pathways don’t just connect points in your industry—they become integral design elements that enhance your garden’s overall aesthetic. When materials and designs complement surrounding features, walkways transform from mere functional elements to essential components of your garden’s character.
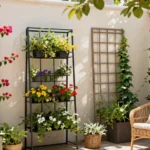
Creating Focal Points Along Your Pathway
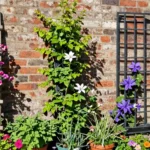
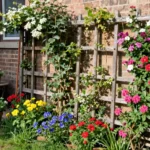
Strategic focal points along garden paths invite exploration and create visual interest throughout your industry. Arbors, pergolas, and decorative gates serve as perfect visual anchors that not only guide movement but also add compelling vertical elements to your garden design. Climbing plants such as roses or clematis can dramatically enhance these structures, creating layers of texture and seasonal color variations. Circular paver mosaics or sections with contrasting materials (like gravel beside brick) effectively define transition zones and draw attention to exact areas such as seating nooks or fire pits. Formal gardens benefit from straight, meticulously clipped hedging alongside brick pathways, emphasizing the symmetry characteristic of traditional English garden design. These intentional focal points transform ordinary paths into journeys of discovery through your outdoor space.
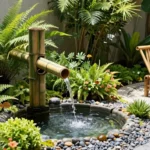
Integrating Water Features with Your Walking Paths
Water features positioned thoughtfully along garden pathways create multisensory experiences that elevate your industry design. Small fountains or water basins placed near walking paths merge both auditory and visual elements, creating peaceful resting spots within your garden journey. Paths leading to ponds or streams should incorporate non-slip materials like textured stone or fine gravel to ensure safety while complementing the natural setting. Moisture-loving plants such as ferns, hostas, or ornamental grasses planted adjacent to both water features and pathways help unify these design elements through cohesive plantings. The sound of moving water adds an additional sensory dimension that transforms simple walks through your garden into immersive experiences. Water-adjacent pathways can be designed with slight elevation changes, allowing visitors to experience water features from different perspectives as they move through the space.
For material selection, consider how different options complement both your water features and overall garden style. Brick pathways offer timeless appeal that works beautifully with formal water features, while decomposed granite provides a more relaxed, natural texture that pairs well with naturalistic ponds or streams. Budget-friendly options include pea gravel or mulch pathways, which can be installed relatively inexpensively while still creating attractive connections to water elements in your industry.


Last update on 2026-02-27 / Affiliate links / Images from Amazon Product Advertising API
Installing Brick Pathways for Classic Elegance

Creating brick pathways begins with proper excavation, digging 6-8 inches deep to establish a solid foundation. We’ll need to add a 4-inch gravel base for effective drainage followed by 1-2 inches of sand. Proper compaction between layers using a tamper is essential for long-term stability. For permanent installations, mortar provides additional security, though sand-only beds offer flexibility for future adjustments. Always ensure a slight slope (1/4 inch per foot) away from structures to prevent water accumulation.
Herringbone and Other Decorative Brick Patterns
Herringbone patterns position bricks at 45° angles to create an interlocking design that offers superior strength for high-traffic areas. This distinctive arrangement distributes weight more effectively across your pathway while providing visual interest. Alternative patterns include stretcher bond with its linear alignment of bricks, basketweave featuring paired bricks in alternating directions, and circular designs for focal points. Your choice of pattern should complement your brick type, with standard modular bricks working best for complex layouts. Setting up mason lines and metal pipes helps maintain straight edges throughout the installation process, ensuring professional results.
Maintaining Brick Pathways Through Seasonal Changes
Annual maintenance includes replenishing sand between joints to prevent weed growth and maintain brick stability. During winter months, avoid using metal shovels that can chip or damage brick surfaces; opt for plastic-edged snow removal tools instead. Frost heave becomes less problematic when pathways have proper base compaction and drainage established during installation. Regular cleaning with mild detergent and a stiff brush removes algae and stains that naturally develop over time. Check edging materials (whether plastic or metal) periodically to ensure they’re still containing the pathway and preventing soil erosion along the borders. These simple maintenance steps preserve your brick pathway’s beauty and structural integrity through changing seasons.
Exploring Concrete Pathway Possibilities

Concrete pathways offer versatility, durability, and endless design options for your outdoor spaces. From classic poured slabs to decorative stamped designs, concrete provides a solid foundation for creating pathways that complement any industry style.
Poured Concrete Pathways
Poured concrete pathways represent one of the most traditional and enduring options available for your outdoor space. These pathways involve pouring wet concrete mix as a single continuous slab, creating a seamless walking surface that stands the test of time. Professional installation often yields the best results, ensuring proper setting and finishing for a pathway that remains beautiful for years. The simplicity of a classic concrete path provides a clean aesthetic that works with virtually any home style or garden design.
Concrete Paver Pathways
Concrete pavers offer exceptional versatility and practical benefits for creating stunning walkways. These individual concrete pieces can be arranged in countless patterns to achieve your desired look, from formal geometric designs to casual meandering paths. Pavers demonstrate superior resistance to weather damage compared to poured concrete, withstanding freeze-thaw cycles more effectively. Replacement of damaged sections becomes significantly easier with pavers, as individual units can be removed without disturbing the entire pathway.
Stamped and Stained Concrete Design Ideas
Stamped concrete transforms ordinary pathways into works of art that mimic premium materials at a fraction of the cost. Common stamping patterns include cobblestone, brick, and flagstone impressions that add dimensional texture and visual interest to your walkway. These patterns are pressed into freshly poured concrete before it fully cures, creating authentic-looking textures that enhance your industry design.
Staining techniques elevate concrete pathways with rich, customized color options that complement your home’s exterior. Acid stains react with the concrete to produce mottled, variegated finishes with depth and character similar to natural stone. Water-based stains offer more consistent coloration with a broader palette of options for precise color matching. Combining different staining methods with stamped patterns creates truly unique pathways that serve as striking industry features rather than merely functional elements.
Freeform Concrete Pathways
Freeform concrete pathways break away from traditional straight lines, embracing flowing, curved designs that add ever-changing movement to your industry. These avant-garde walkways feature smooth finishes and unpredictable shapes that create visual interest throughout your garden spaces. The organic lines of freeform pathways complement contemporary architecture and naturalistic garden styles, providing an artistic element that enhances the overall design aesthetic.
Nature-Harmonized Walkways
Concrete pathways can beautifully integrate with natural elements through thoughtful design approaches. Incorporating grass inlays between concrete stepping stones or stairs creates a harmonious blend of structural support and living greenery. These hybrid designs soften the appearance of concrete while maintaining its durability and functionality. The contrast between smooth concrete surfaces and lush plant material adds textural interest that engages the senses as you move through the space.
Pouring Perfect Concrete Paths: DIY Tips
Proper preparation forms the foundation for successful DIY concrete pathway projects. Always ensure your pathway area is completely level and cleared of debris, roots, and loose soil before beginning. Excavate approximately 6 inches below your desired finished height to accommodate base materials and the concrete itself. Installing forms using flexible lumber or metal edging will define your pathway boundaries and help contain the wet concrete during pouring.
Mixing concrete requires attention to proper ratios for optimal strength and workability. Follow manufacturer instructions precisely, typically using 3 parts aggregate, 2 parts sand, and 1 part cement, adding water gradually until achieving a thick, workable consistency. Small batches work best for DIY projects, allowing enough time to place and finish the concrete before it begins setting.
Finishing techniques make the difference between amateur and professional-looking results. Use a screed board to level the surface by pulling it across the top of your forms in a sawing motion. Follow with a float to smooth the surface and bring cream to the top, then wait until the concrete is thumbprint-hard before final troweling. Create a slight slope (about 1/8 inch per foot) away from structures to ensure proper drainage.
The curing process deserves careful attention to prevent cracking and ensure maximum strength. Keep the concrete moist for at least seven days by covering it with plastic sheeting or applying a curing compound. Spraying the surface periodically with water helps maintain ideal moisture levels during hot weather. Allow the concrete to cure fully (typically 28 days) before subjecting it to heavy use or applying sealants.


Last update on 2026-02-28 / Affiliate links / Images from Amazon Product Advertising API
Embracing Eco-Friendly Permeable Pathway Options

Permeable pathway options have become increasingly popular among environmentally conscious homeowners looking to create sustainable outdoor spaces. These innovative pathways not only enhance your garden’s aesthetic appeal but also provide important environmental benefits by managing rainwater effectively.
Permeable Pavers for Effective Water Management
Permeable pavers stand out as an excellent eco-friendly pathway solution that allows water to pass through and soak into the ground naturally. This design significantly reduces runoff, preventing common industry problems like flooding and erosion during heavy rainfall. Water management becomes effortless as these pavers create natural drainage systems that maintain soil health and replenish groundwater supplies. Adding polymeric sand between pavers enhances both their permeability and structural stability, ensuring your pathway remains functional for years to come. We’ve found these pavers particularly beneficial in areas prone to water accumulation, as they transform potential problem areas into attractive, functional spaces.
Recycled Material Pathways for Sustainable Gardens
Repurposing materials for garden pathways offers an innovative approach to sustainable landscaping that reduces environmental impact. Recycled glass creates stunning pathways with unique visual appeal, catching light and adding unexpected sparkle to garden designs. Reclaimed plastic materials transform waste into durable pathway answers that withstand harsh weather conditions without degradation. Crushed recycled concrete provides a sturdy base for eco-friendly pathways while diverting construction waste from landfills. These recycled material options typically cost less than traditional pathway materials, making them budget-friendly alternatives that don’t compromise on quality or appearance. Incorporating these sustainable materials allows us to create distinctive outdoor spaces while contributing positively to environmental conservation efforts.
Plant-Friendly Stepping Stone Arrangements
Stepping stone pathways offer perfect integration between hardscaping and living garden elements, creating harmonious outdoor environments. Natural stone or wooden stepping stones placed with deliberate spacing allow low-growing plants to thrive between them, improving biodiversity in your garden space. The strategic arrangement of these stones facilitates efficient water drainage while creating micro-ecosystems for beneficial insects and small plants. Various patterns—from straight lines to curving designs—can be created to complement your garden’s overall aesthetic while maintaining functionality. We recommend selecting plant varieties like creeping thyme, moss, or low-growing sedums to fill the spaces between stones, creating a lush, living pathway that evolves with the seasons. This approach transforms a simple walkway into a ever-changing garden feature that supports local ecology while providing practical access through your outdoor space.
Designing Accessible Pathways for All Ages and Abilities

Creating truly inclusive outdoor spaces requires thoughtful pathway design that accommodates everyone regardless of age or mobility. Accessible pathways not only comply with regulations but also enhance usability for all visitors.
Width & Slope Requirements
Accessible pathways must be at least 36 inches wide, though 60 inches is ideal for accommodating two-way traffic and wheelchairs passing each other. Running slopes should not exceed 5% (a 1:20 ratio) to ensure easy navigation for wheelchair users and those with limited mobility. Cross slopes need to remain at or below 2.08% (a 1:48 ratio) to prevent wheelchairs from drifting sideways. For pathways narrower than 60 inches, incorporating level rest areas every 200 feet allows for passing and wheelchair maneuvering. These design specifications ensure pathways remain navigable for everyone while maintaining aesthetic appeal.
Gentle Slope Considerations for Wheelchair Access
Pathway slopes require careful planning to ensure wheelchair accessibility. Standard requirements dictate that ramps must not exceed a 1:12 ratio (8.3% grade) unless terrain makes this impossible. Any pathway sections with slopes steeper than 5% should include handrails for support and tactile warning surfaces to alert users of the grade change. Steeper sections also benefit from frequent resting intervals—specifically every 30 feet—where users can pause safely on level ground. For locations where terrain makes accessible slopes impossible, consider alternative answers such as providing elevators in nearby buildings or free transit options to ensure equal access for all visitors.
Non-Slip Surface Options for Safe Navigation
Surface material selection plays a crucial role in creating safe, accessible pathways. Firm, stable surfaces like compacted crushed stone, textured concrete, or resin-bound aggregates provide ideal footing for all users. These materials resist displacement and maintain their structure even under wheeled traffic or in varying weather conditions. Avoid loose materials like traditional gravel or uneven pavers that can create hazards for wheelchair users, people using walkers, or those with balance issues. Texture standards should include broom-finished concrete or rough-finish stone to reduce slip risks, particularly on sloped sections. Also, limit vertical gaps between pavers or sections to ¼ inch or less, allowing for ½ inch only if the transition is beveled at a 1:20 slope.
Curb Cuts & Transitions
Effective transitions dramatically improve pathway accessibility. Install curb ramps at all crosswalks and pathway intersections, ensuring they have flared sides with slopes no steeper than 10%. Include detectable warning surfaces at street transitions to alert visually impaired users of the boundary between pedestrian and vehicle areas. Pay special attention to adjacent gutters and ensure they don’t create hazardous gaps that could trap wheelchair casters or walking aids. These thoughtful transition elements create seamless navigation between different areas of your industry.
Inclusive Features
Creating truly accessible pathways involves attention to many details beyond the path itself. Doorways or entry points along the path should maintain a minimum clear opening width of 32 inches to accommodate wheelchairs and mobility devices. When calculating ramp width, exclude flared sides from your measurements to ensure the usable space meets requirements. Install tactile and braille signage at key decision points, particularly where grades might exceed accessibility limits, to help visually impaired users navigate safely. These inclusive features transform basic pathways into welcoming routes that everyone can enjoy with dignity and independence.
Seasonal Maintenance Tips to Preserve Your Pathway Investment
Transforming your outdoor space with the perfect pathway doesn’t end with installation. These design elements require ongoing care to maintain their beauty and functionality year after year.
With the right materials and thoughtful design choices you’ll create pathways that not only enhance your industry’s visual appeal but also stand the test of time. Whether you’ve opted for classic brick elegance modern concrete or eco-friendly permeable options regular maintenance ensures lasting enjoyment.
We’ve shared diverse pathway answers to suit various budgets styles and practical needs. By incorporating proper lighting accessibility features and complementary garden elements you’ll create outdoor pathways that truly elevate your property.
Remember that the best pathway designs balance aesthetics functionality and sustainability while reflecting your unique style and addressing your exact outdoor needs.
Frequently Asked Questions
What are the most popular materials for garden pathways?
The most popular materials for garden pathways include classic brick, contemporary concrete, natural stone, gravel, and wood. Each material offers unique benefits: brick provides timeless elegance, concrete offers modern flexibility, natural stone connects with nature, gravel ensures excellent drainage, and wooden boardwalks add warmth and architectural interest. Your choice should depend on your budget, aesthetic preferences, and the overall style of your outdoor space.
How do I install a gravel pathway on a budget?
To install a budget-friendly gravel pathway, first mark the path area and remove existing vegetation. Dig 2-3 inches deep, add landscape fabric to prevent weed growth, and install edging to contain the gravel. Add a 2-inch layer of crushed stone base for drainage, then top with your chosen gravel (pea gravel or decomposed granite work well). Spread evenly and compact with a tamper. This DIY project can be completed in a weekend for minimal cost.
What lighting options work best for garden pathways?
The best lighting options for garden pathways include solar-powered lights, which are eco-friendly and easy to install without wiring, and low-voltage LED fixtures that create warm ambiance. Solar lights work well along borders, while recessed lighting can be integrated into steps. Strategic placement at transitions and turns enhances both safety and aesthetics. For the best results, combine different lighting types to create layers of illumination.
How wide should a pathway be for wheelchair accessibility?
For wheelchair accessibility, pathways should be at least 36 inches wide, though 48 inches is preferred to allow comfortable passage. For two wheelchairs to pass each other, 60-72 inches is ideal. Ensure the pathway has a firm, stable, non-slip surface with a maximum cross slope of 2% and running slope under 5%. Include level resting areas every 200-300 feet on longer paths and ensure smooth transitions at entrances and exits.
Are permeable pathways better for the environment?
Yes, permeable pathways are significantly better for the environment. They allow rainwater to filter through to the soil rather than causing runoff, which helps replenish groundwater, reduces flooding risk, and prevents erosion. These pathways also filter pollutants from water, reduce the heat island effect, and can contribute to LEED certification for properties. Options include permeable pavers, gravel, and recycled materials like crushed glass or rubber, which combine sustainability with attractive design.
How do I maintain a brick pathway through seasonal changes?
To maintain a brick pathway year-round, sweep regularly and rinse occasionally to prevent debris buildup. In spring, inspect for winter damage and reset any heaved bricks. During summer, pull weeds promptly and consider applying a polymeric sand between joints. In fall, remove leaves to prevent staining and slipping hazards. For winter, use calcium chloride instead of rock salt for ice removal, and choose plastic shovels over metal ones to prevent scratching the brick surface.
What’s the difference between poured concrete and concrete pavers?
Poured concrete pathways provide a seamless, contemporary look with unlimited design flexibility but require professional installation and may crack over time. Concrete pavers, on the other hand, offer easier installation (often DIY-friendly), simple replacement of damaged sections, and greater flexibility for patterns and designs. Pavers typically have higher upfront costs but lower long-term maintenance expenses, while poured concrete is initially less expensive but may require costly repairs if damaged.
How can I incorporate water features with my garden pathway?
Integrate water features with your pathway by installing a small stream that runs alongside or beneath a wooden bridge section. Create a pathway that circles a central pond or fountain as a focal point. For a sophisticated design, incorporate a rill—a narrow water channel—alongside your path. Use moisture-resistant materials like stone or concrete near water features, and consider installing subtle lighting to enhance the water’s reflective quality at night.
What are the best eco-friendly options for pathway materials?
The best eco-friendly pathway materials include permeable pavers that reduce runoff, recycled materials like crushed glass or rubber, reclaimed wood or brick that prevents new resource consumption, decomposed granite which is natural and permeable, and stepping stones combined with ground cover plants. For a truly sustainable approach, source materials locally to reduce transportation emissions and choose options that work with your local climate to minimize maintenance requirements.
How do I create an illuminated pathway that’s energy-efficient?
Create an energy-efficient illuminated pathway by using solar-powered lights that charge during the day and automatically illuminate at night with zero electricity costs. Choose LED fixtures for areas requiring stronger illumination, as they use 75% less energy than incandescent bulbs and last much longer. Install motion sensors to activate lighting only when needed, and select fixtures with reflective surfaces to maximize light output. Consider downward-facing fixtures to reduce light pollution.