Looking to enhance your outdoor space without very costly? We’ve got you covered with DIY outdoor lighting answers that’ll transform your yard into a magical nighttime retreat. From string lights to solar-powered fixtures, creating the perfect outdoor ambiance is easier than you’d think.
In our experience, outdoor lighting isn’t just about functionality—it’s about creating atmosphere, improving safety, and extending your living space beyond your home’s walls. Whether you’re hosting summer gatherings or simply enjoying peaceful evenings outside, the right lighting makes all the difference.
Join us as we share our top DIY outdoor lighting tips that combine creativity with practicality. You’ll discover how to illuminate pathways, highlight landscaping features, and create cozy conversation areas—all while saving money and expressing your personal style.
10 Essential DIY Outdoor Lighting Tips for a Magical Backyard
- Plan your lighting layout first
Creating a map of your outdoor space before installing any lights will save you time and money. Sketch your yard on paper, marking key features like trees, pathways, and seating areas. We recommend walking through your space at night with a flashlight to identify dark spots that need illumination. This initial planning ensures your lighting serves both practical and aesthetic purposes.
- Layer different types of lighting
Combining ambient, task, and accent lighting creates depth and interest in your outdoor space. Ambient lighting provides overall illumination, task lighting serves functional purposes like illuminating cooking areas, while accent lighting highlights exact features. String lights create ambient glow, solar path lights offer task lighting for walkways, and spotlights accent trees or architectural elements.
- Embrace solar-powered options
Solar lights eliminate the need for complicated wiring and reduce electricity costs. These fixtures charge during the day and automatically illuminate at dusk. Modern solar lights come in various styles and brightness levels, making them perfect for paths, steps, and accent lighting. We’ve found placing solar lights in spots that receive 6-8 hours of direct sunlight ensures optimal performance.
- Incorporate weather-resistant materials
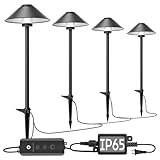
Outdoor lighting must withstand the elements year-round. Choose fixtures made from corrosion-resistant materials like brass, copper, or powder-coated aluminum. Sealed fixtures with proper IP (Ingress Protection) ratings prevent moisture damage. IP65 or higher ratings indicate excellent protection against dust and water jets.
- Use LED bulbs for efficiency
LED bulbs consume up to 80% less energy than traditional incandescent bulbs and last 25 times longer. These energy-efficient options come in various brightness levels and color temperatures. Warm white LEDs (2700K-3000K) create a cozy atmosphere similar to traditional bulbs, while cool white options (3500K-4100K) provide brighter, more functional lighting.
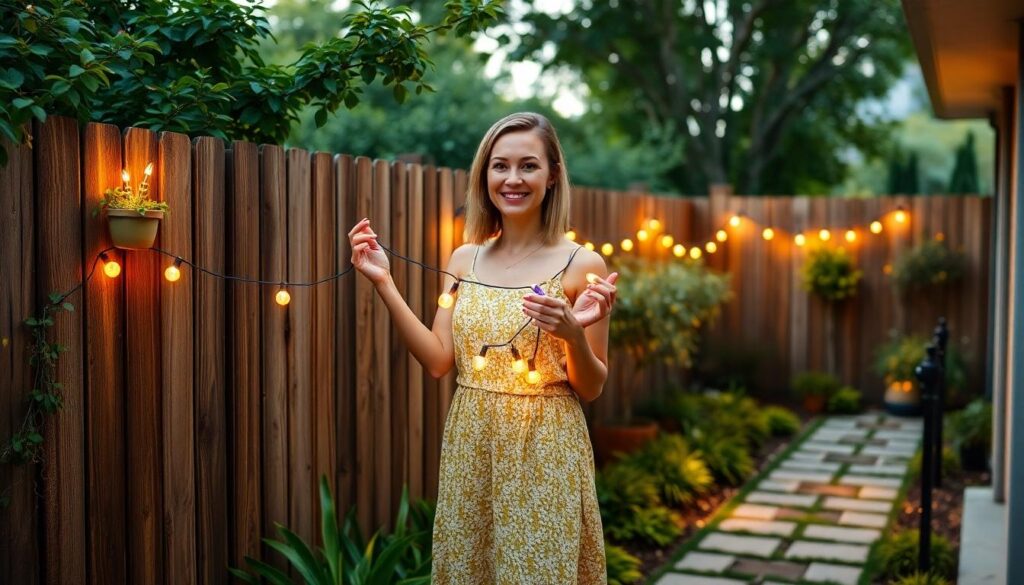
- Create magic with string lights
String lights instantly transform outdoor spaces with their warm, festive glow. Zigzag patterns across patios create canopy effects, while wrapping tree trunks adds vertical interest. Commercial-grade string lights withstand weather conditions better than decorative holiday versions. Connecting multiple strands to a timer or smart plug allows automatic operation.
- Install pathway lighting for safety
Path lights guide guests safely through your outdoor spaces while adding visual interest. Space fixtures 6-8 feet apart along walkways for consistent illumination without creating a “runway” effect. Low-voltage or solar options are perfect for DIY installation. We recommend positioning lights slightly off the path rather than directly on edges for a more natural look.
- Highlight industry features
Spotlights and uplights draw attention to trees, shrubs, and architectural elements. Adjust the angle and distance to create dramatic shadows or soft highlighting effects. Colored lens filters can add interest to water features or garden sculptures. Small, well-placed lights have more impact than flooding an area with brightness.
- Incorporate creative upcycled fixtures
Transform everyday items into unique lighting fixtures. Mason jars filled with solar fairy lights create charming lanterns, while old metal colanders become pendant lights with interesting shadow patterns. Wine bottles can be converted into tiki torches or cut to create protective covers for string lights. These personalized touches add character while reducing waste.
- Add smart technology controls
Smart plugs and lighting systems allow remote control via smartphone apps. Program lighting schedules, adjust brightness, or change colors without going outside. Motion sensors can automatically illuminate areas when needed for convenience and security. Many systems integrate with voice assistants like Alexa or Google Home for hands-free operation.
Creating a Lighting Plan Before You Begin

A well-designed outdoor lighting plan transforms your space and ensures both functionality and aesthetic appeal. Start by sketching a layout of your outdoor area, noting existing features like trees, paths, and structures. Choose fixtures based on their exact purpose: path lights for walkways, spotlights for vertical elements, and ambient string lights for seating areas. When planning your system, decide between low-voltage, solar, or plug-in options while ensuring compatibility with your existing setup.
Identifying Key Areas to Illuminate
Safety should be your top priority when identifying lighting zones. Focus first on entryways, staircases, and pathways where proper illumination prevents accidents and improves navigation. Architectural details such as columns or unique structural elements deserve attention through strategic lighting placement. Mature trees and notable landscaping features benefit from upward-facing floodlights that showcase their beauty after dark. Gardens require special consideration—opt for low-wattage fixtures that complement rather than overpower delicate plants. Map out these key areas on your initial sketch to create a comprehensive lighting blueprint before purchasing any equipment.
Balancing Ambient, Task, and Accent Lighting
Effective outdoor lighting incorporates three distinct types that work together to create a layered, dimensional space. Ambient lighting provides general illumination through soft-glowing wall sconces or pergola-mounted string lights that establish the overall brightness level in your outdoor area. Task lighting focuses on exact functional zones where activities take place, such as directional fixtures near grills, benches, or outdoor kitchen areas. Accent lighting adds drama and depth by highlighting exact features—use spotlights to illuminate textured surfaces like stone walls or water features. Combining these three lighting types creates visual interest while ensuring your outdoor space remains functional for various activities. LED bulbs work exceptionally well in all three categories, offering energy efficiency and longevity that reduces maintenance time and costs.
| # | Preview | Product | Price | |
|---|---|---|---|---|
| 1 |

|
Taming the Dragon: America's Most Dangerous Highway | Buy on Amazon |
Last update on 2026-02-27 / Affiliate links / Images from Amazon Product Advertising API
Solar-Powered Lighting Solutions for Energy Efficiency

Solar-powered lighting offers an eco-friendly and cost-effective approach to illuminating your outdoor spaces. Creating an efficient system requires four essential components: solar panels that convert sunlight into electricity, batteries for storing energy, controllers to regulate charging, and energy-efficient LED lights. You can build a customized setup using these elements to match your exact needs while saving money.
Best Placement for Maximum Solar Charging
Positioning your solar panels correctly is crucial for optimal energy collection. Place solar lighting units in locations that receive direct sunlight for most of the day to ensure maximum charging efficiency. South-facing positions typically capture the most sunlight throughout the day, making them ideal spots for solar panels. Avoid areas where trees, buildings, or other structures cast shadows on your solar lights, as this significantly reduces their charging capacity. Strategic placement will ensure your solar lights remain powered throughout the evening hours.
Stylish Solar Light Options for Different Spaces
Many stylish solar lighting options can enhance various outdoor areas while maintaining energy efficiency. Pathway lights provide both safety and ambiance along walkways and driveways, guiding guests safely through your outdoor space after dark. Spotlights work wonderfully for highlighting exact industry features such as gardens, sculptures, or architectural elements. String lights add a festive, decorative touch to patios, pergolas, or trees, creating a magical atmosphere for outdoor gatherings. Lantern-style solar lights bring a traditional or rustic aesthetic to garden areas, combining classic design with modern solar technology. Each option serves a exact purpose while contributing to an environmentally friendly lighting solution for your outdoor space.
String Light Installation Techniques for Instant Ambiance

String lights instantly transform any outdoor space into a warm, inviting oasis. Installing them properly ensures they’ll look great and withstand the elements season after season.
Secure Hanging Methods That Withstand Weather
Wire tensioning systems with turnbuckles offer one of the most reliable methods for hanging string lights outdoors. These systems maintain tight, weather-resistant lines that won’t sag or come loose during storms. For areas without permanent structures, freestanding posts provide excellent flexibility—simply secure 4×4 wooden poles in buckets filled with fast-setting concrete for remarkable stability. No-dig ground anchors paired with steel chain-link rails create sturdy temporary setups perfect for renters or seasonal displays.
Concrete anchoring gives your light posts unmatched stability. Set posts in 2-gallon buckets with gravel or concrete, ensuring proper drainage while adding substantial weight. Vinyl-coated steel wires resist corrosion and prevent sagging, especially when combined with carabiners that allow for easy seasonal adjustments. Expansion hooks attach directly to siding or brick surfaces without compromising your home’s weather resistance, making them ideal for permanent installations along eaves or walls.
Pattern Ideas for Visual Impact
Crisscross grid patterns create dramatic overhead canopies when strung between posts or trees, providing full coverage for dining areas or patios. Perimeter outlining follows the natural boundaries of your space—tracing fences, eaves, or pathways to clearly define outdoor rooms and create a cozy atmosphere. Draping techniques produce elegant swooping curves between anchor points, delivering a relaxed, casual aesthetic perfect for bohemian or garden-inspired designs.
Post-to-post runs using evenly spaced poles (8-12 feet apart) prevent unsightly sagging while creating clean, organized lines across your space. For permanent installations, we recommend using industrial-grade string lights with weatherproof cords and commercial-style bulbs that stand up to year-round exposure. Pressure-treated cedar or galvanized components significantly reduce weather damage on posts and hardware. Stainless steel fasteners and connectors resist rust and corrosion, ensuring your lighting display remains secure and attractive for years to come.
Using Pathway Lights to Enhance Safety and Style

Pathway lights serve the dual purpose of improving visibility while also improving your home’s curb appeal. For optimal results, select low-voltage LED lights, which are highly energy-efficient, or solar-powered fixtures that work perfectly in sun-exposed areas. Position these lights along walkways at consistent intervals of 2-3 feet to prevent tripping hazards and guide movement naturally. Choose fixtures with warm white bulbs (2700K-3000K) to create a welcoming atmosphere that complements your outdoor space.
DIY Path Light Projects Using Upcycled Materials
Everyday household items can transform into charming pathway lighting answers with minimal effort. Repurpose tin cans, mason jars, or wine bottles as creative housings for solar lights or LED candles. Drill several small drainage holes in the bottom of containers to prevent water accumulation during rainy weather. Apply weather-resistant paint or sealant to your upcycled fixtures to ensure they withstand outdoor elements year-round. For solar-powered options, secure the solar panels to the top of your upcycled containers, making sure they’re positioned to receive maximum sunlight for adequate charging throughout the day.
Proper Spacing and Positioning Guidelines
Spacing: Install pathway lights 6-8 feet apart for standard walkways to provide consistent illumination without overwhelming the space. For areas requiring denser lighting coverage, reduce this spacing to 2-3 feet between fixtures.
Angle: Position uplights at a 30-45 degree angle when highlighting trees or architectural features to achieve dramatic effects without creating uncomfortable glare. Keep fixtures at least 5 feet away from walls to avoid casting harsh shadows that can distract from the overall aesthetic.
Height: Mount pathway lights 12-18 inches above ground level to achieve optimal illumination that guides visitors without shining directly into their eyes.
Power: Select a low-voltage transformer (12-15V) for wired lighting systems, ensuring its capacity matches the total wattage of all connected fixtures. For solar-powered options, place the panels in locations that receive direct sunlight for at least 6 hours daily for maximum efficiency.
For best results, group lighting fixtures in odd numbers (3-5) near seating areas to create balanced, visually appealing illumination. Bury electrical wires 6-8 inches deep to protect them from industry maintenance and weather damage. Before permanent installation, test your layout using temporary stakes to visualize the lighting effect and make adjustments as needed.


Last update on 2026-02-27 / Affiliate links / Images from Amazon Product Advertising API
Mason Jar and Repurposed Container Lighting Projects

Transform ordinary containers into charming outdoor lighting fixtures with these simple DIY projects. Mason jars and other repurposed containers offer an eco-friendly way to add personality to your outdoor spaces while providing gentle illumination.
Choose Materials
Select containers that can withstand outdoor exposure such as mason jars, vintage bottles, or metal cans. Glass mason jars work exceptionally well due to their durability and classic aesthetic appeal. Consider using colored glass containers for a more vibrant light display when illuminated. Thicker containers typically offer better resistance to temperature changes and outdoor conditions.
Lights and Power
Install small LED string lights or battery-operated candles inside your containers for a safe lighting option. Solar-powered lights represent an excellent choice for outdoor projects, eliminating the need for outlets or extension cords. Battery-operated tea lights provide a convenient alternative when solar isn’t practical. Waterproof LED strips can be coiled inside larger containers to create a brighter effect for areas needing more illumination.
Safety Measures
Ensure all electrical components remain protected from moisture by using waterproof options whenever possible. Apply silicone caulk around any drilled holes or openings where wires enter containers. Place containers under covered areas if using non-waterproof lighting components to extend their lifespan. Avoid using real candles in dry areas or near flammable materials to prevent fire hazards.
Waterproofing Techniques for Outdoor Use
Seal all openings with waterproof sealants like silicone caulk or marine-grade epoxy to protect against moisture infiltration. Apply clear waterproof spray to the exterior of paper-decorated containers for additional protection. Protect electrical connections by wrapping them with waterproof electrical tape and housing them in waterproof junction boxes. Opt for naturally water-resistant materials such as ceramic, metal, or thick glass containers that inherently withstand outdoor conditions better than plastic alternatives.
Creative Hanging and Mounting Ideas
Hang mason jar lights from tree branches using sturdy wire or rope to create a magical canopy effect over entertaining areas. Mount container lights to walls or fences using metal brackets or decorative hooks to highlight architectural features and provide functional lighting. Position stake-mounted container lights along pathways to illuminate walkways safely while adding visual interest to your industry. Create clustered arrangements at different heights for a more dramatic lighting effect in garden corners or entryway areas.
Building Weather-Resistant Fixtures From Scratch

Creating your own outdoor lighting fixtures can be both rewarding and cost-effective. When building fixtures from scratch, it’s essential to select materials like aluminum, stainless steel, or durable plastics that can withstand rain, snow, and UV exposure to ensure longevity.
Selecting Durable Materials for Outdoor Conditions
Choosing the right materials forms the foundation of any successful outdoor lighting project. Materials such as aluminum, stainless steel, and high-quality plastics offer excellent resistance to harsh weather conditions, preventing rust and deterioration over time. Waterproof LED lights should be your go-to option since they provide energy-efficient illumination while standing up to moisture and temperature fluctuations. All components in your DIY fixtures must be specifically designed for outdoor use to prevent premature failure and safety hazards. Durability should be your primary consideration when selecting hardware like screws, brackets, and mounting plates, as these elements will be constantly exposed to the elements.
Weatherproofing Electrical Components
Proper sealing of electrical connections is crucial for preventing moisture infiltration and ensuring fixture longevity. Use weatherproof electrical connectors and apply high-quality silicone sealant around all connection points to create a watertight barrier against rain and humidity. Weatherproof wire connectors that include protective shields and built-in sealants offer superior protection for exposed wiring, preventing water damage that could lead to short circuits. Install weather-resistant outlets and transformers specifically rated for outdoor applications to maintain safety and reliability regardless of weather conditions. Power distribution components should be mounted in elevated, sheltered locations whenever possible to provide an additional layer of protection from direct water exposure. Rubber gaskets can be added between fixture seams to create a more effective moisture barrier while still allowing for maintenance access when needed.
| # | Preview | Product | Price | |
|---|---|---|---|---|
| 1 |

|
iSYFIX Emergency Exit Only Stickers – 2 Pack 10x7 Inch – Premium Self-Adhesive Vinyl, Laminated... | $8.95 | Buy on Amazon |
Last update on 2026-02-27 / Affiliate links / Images from Amazon Product Advertising API
Incorporating Smart Lighting Technology on a Budget

Smart outdoor lighting doesn’t have to expensive. With careful planning and strategic choices, you can create an automated lighting system that enhances your outdoor space while keeping costs manageable.
Choose Affordable Options
Start your smart lighting journey with budget-friendly starter kits like Sylvania’s Gardenspot, which offers multicolor smart lights for around $70. These entry-level systems provide the functionality you need without the premium price tag of high-end alternatives. Look for sales, bundle deals, and off-season discounts to maximize your savings while building your smart lighting collection.
DIY Installation
Save substantially by handling the installation yourself rather than hiring professionals. Many video tutorials and step-by-step guides are available online to walk you through the process of installing smart outdoor lights. This approach not only reduces costs but also gives you a better understanding of your lighting system for future maintenance and upgrades.
Energy Efficiency
Invest in energy-efficient smart lights that can be controlled remotely to reduce your electricity consumption. Smart lighting allows you to program schedules, adjust brightness levels, and turn off lights when not needed, resulting in lower energy bills over time and offsetting the initial investment cost.
DIY Smart Lighting Automation Tips
Smart home integration transforms your outdoor lighting experience by adding convenience and functionality. Connect your outdoor lights to smart hubs or devices like Alexa to control them with voice commands, making adjustments effortless even when your hands are full during outdoor gatherings.
App control provides unparalleled flexibility for managing your outdoor lighting system. Most smart lighting answers come with dedicated apps that let you schedule lighting times, dim fixtures for the perfect ambiance, or change colors to match different occasions—all from your smartphone or tablet.
Motion sensors add both security and convenience to your outdoor lighting setup. These automated devices detect movement and trigger your lights accordingly, ensuring pathways are illuminated when needed and conserving energy when areas are unoccupied.
Integrating with Existing Home Systems
System compatibility should be a top priority when selecting smart outdoor lighting. Verify that any new lighting products work seamlessly with your existing smart home network to avoid frustrating compatibility issues or the need for multiple control apps.
Wiring integration requires careful planning when using hardwired smart lighting options. Ensure proper connection to your home’s electrical system for safety and reliability, following manufacturer guidelines or consulting with an electrician if you’re uncertain about any aspects of the installation.
Voice control capabilities elevate your outdoor lighting experience to new levels of convenience. Configure your lights to respond to commands through popular assistants like Google Home or Alexa, allowing you to adjust your outdoor ambiance without leaving the comfort of your lounge chair or grill station.
Seasonal Outdoor Lighting Projects and Ideas

Transform your outdoor spaces throughout the year with lighting that matches each season’s unique activities and celebrations. Seasonal lighting allows you to adapt your outdoor areas to different occasions while maximizing enjoyment.
Summer Entertainment Lighting Answers
String lights create instant ambiance for summer gatherings in your backyard or patio. We recommend hanging Edison-style bulbs across your dining area to cast a warm, inviting glow that encourages guests to linger long after sunset. Solar-powered lanterns offer flexible lighting answers that can be repositioned around your yard depending on where your guests gather. Spotlights strategically placed near garden features draw attention to your summer blooms while providing functional lighting for evening barbecues and pool parties. Pathway lights not only ensure safety but also guide your guests through your outdoor entertainment zones.
Holiday and Special Occasion Lighting Techniques
Holiday lighting transforms ordinary spaces into magical seasonal displays with minimal effort. For Christmas celebrations, combine net lights on bushes with icicle lights along your roofline to create a cohesive winter wonderland effect throughout your property. Halloween lighting can incorporate color-changing fixtures aimed at trees to cast spooky shadows, alongside pathway lights in orange or purple hues. We suggest using programmable timers to automate your holiday lighting displays, ensuring they turn on at dusk and off at an appropriate hour. For special events like outdoor weddings or milestone celebrations, fairy lights woven through arbors or wrapped around tree trunks create an enchanted atmosphere without requiring permanent installation.


Last update on 2026-02-27 / Affiliate links / Images from Amazon Product Advertising API
Troubleshooting Common DIY Outdoor Lighting Problems

Even the best DIY outdoor lighting setups can experience issues over time. Understanding how to diagnose and fix common problems will help maintain your beautiful outdoor illumination for years to come.
Fixing Flickering and Connection Issues
Flickering lights in your outdoor setup typically result from voltage drops or loose connections. When lights begin to flicker, first check the voltage at fixtures using a multimeter—readings below 10V indicate insufficient power reaching your lights. Long low-voltage runs often cause power degradation, requiring thicker-gauge cables (12-16 AWG) to improve current flow. Secure wiring is essential for proper functioning, so inspect all connection points for corrosion or looseness. Waterproof connectors combined with dielectric grease provide excellent protection against moisture damage that commonly disrupts electrical connections. For fixtures that have stopped working completely, try re-piercing wire connectors, ensuring the prongs fully penetrate the conductor. Always verify that your transformer matches the total system wattage to prevent power-related issues that lead to inconsistent lighting performance.
Extending the Lifespan of Your DIY Lights
LED bulbs dramatically outperform traditional halogen options in both efficiency and longevity, with lifespans exceeding 20,000 hours of use. Investing in fixtures with IP65+ ratings ensures superior weather resistance, protecting internal components from rain, snow, and humidity. Regular maintenance plays a crucial role in extending fixture life—clean lenses and solar panels monthly to maintain optimal brightness and energy collection. Solar-powered lighting options eliminate complex wiring challenges while reducing energy costs, though they require direct sunlight exposure to function effectively. Position solar fixtures where they’ll receive maximum sunlight during peak hours to ensure sufficient charging for nighttime illumination. Applying protective coatings to metal components helps prevent oxidation in coastal or high-humidity environments. Proper installation initially, including appropriate wire gauges and waterproof connections, establishes a foundation for lighting systems that will perform reliably for many seasons.
Conclusion: Illuminating Your Outdoor Space with Confidence
Transforming your outdoor space with DIY lighting is both rewarding and accessible. We’ve explored everything from planning your layout to troubleshooting common issues while emphasizing budget-friendly answers throughout.
Remember that successful outdoor lighting balances functionality with aesthetic appeal. Whether you’re creating pathways with mason jar lights hanging string lights over your patio or exploring smart lighting technology there’s a DIY solution for every space and budget.
The beauty of DIY outdoor lighting lies in its versatility and personal expression. By following the tips and techniques we’ve shared you’ll be able to create an inviting well-lit outdoor oasis that reflects your unique style and extends your living space under the stars.
Now it’s time to gather your supplies and bring your outdoor lighting vision to life!
Frequently Asked Questions
What are the benefits of DIY outdoor lighting?
DIY outdoor lighting enhances ambiance, improves safety, extends living spaces, and allows for personal expression while saving money. It transforms your yard into a magical nighttime retreat and highlights landscape features. With proper planning, you can create a customized lighting scheme that serves both functional and aesthetic purposes at a fraction of professional installation costs.
How do I plan my outdoor lighting layout?
Start by mapping your outdoor space to identify key features and dark spots. Sketch your yard and mark areas that need illumination, including pathways, entryways, and focal points. Consider the three lighting layers: ambient (overall illumination), task (functional lighting), and accent (highlighting features). Test different positions before permanent installation to ensure optimal placement and coverage.
Are solar-powered lights effective for outdoor lighting?
Yes, solar-powered lights are highly effective for outdoor lighting. They’re eco-friendly, cost-effective (no electricity bills), and easy to install without wiring. Modern solar lights include quality panels, batteries, controllers, and LED bulbs that provide reliable illumination. For best results, place panels in south-facing positions with direct sunlight and choose weather-resistant options designed for outdoor use.
How should I install string lights for the best effect?
Install string lights by first planning your pattern (zigzag, perimeter, or canopy). Use proper anchoring points like trees, posts, or buildings, ensuring they can support the weight. Space supports no more than 15 feet apart to prevent sagging. Choose industrial-grade lights for durability and weatherproofing. Create visual interest by varying heights and density, and consider dimmer switches for adjustable ambiance.
What’s the best spacing for pathway lights?
Space pathway lights 8-10 feet apart for even illumination without creating a “runway” effect. For curves or steps, reduce spacing to 4-6 feet for safety. Position lights slightly off the path edge rather than directly on it. Install at consistent heights (typically 14-18 inches tall) and stagger lights on opposite sides for balanced lighting. Always test your layout before permanent installation.
How can I create DIY lighting fixtures from everyday items?
Transform mason jars, tin cans, wine bottles, or metal lanterns into unique lighting fixtures. For mason jars, add small LED string lights or solar-powered lids. Clean and prepare containers by removing labels and creating decorative patterns with drilled holes. Waterproof all electrical components with silicone sealant. Group fixtures in odd numbers at varying heights for visual interest and suspend using durable wire, chains, or hooks.
What materials are best for weather-resistant outdoor lighting?
Choose marine-grade aluminum, stainless steel, copper, or high-quality plastics with UV protection for fixture housing. Use waterproof LED lights specifically rated for outdoor use (minimum IP65 rating). Apply silicone sealant to seal all electrical connections and use outdoor-rated wire connectors. Install fixtures under eaves or protected areas when possible and elevate components above potential water accumulation points to maximize durability.
How can I incorporate smart lighting on a budget?
Start with affordable smart bulbs or budget-friendly starter kits that work with existing fixtures. Choose DIY installation over professional services. Opt for energy-efficient LEDs with scheduling capabilities to reduce electricity costs long-term. Look for systems compatible with your smartphone and existing smart home platform (if applicable). Consider motion sensors for security areas rather than comprehensive smart lighting throughout the entire property.
How do I troubleshoot flickering outdoor lights?
Flickering lights typically indicate loose connections or voltage drops. Check all connections and tighten or reseal with waterproof connectors. For voltage drops in longer runs, use thicker gauge wiring (12 or 14 AWG) or install a larger transformer. Ensure proper wire burial depth (at least 6 inches) in conduit. Clean solar panels and check battery connections for solar lights. Replace damaged components immediately and verify transformer capacity matches your lighting load.
How can I make my DIY outdoor lighting last longer?
Install fixtures under overhangs where possible to reduce weather exposure. Use high-quality, weather-resistant materials and proper waterproofing techniques. Apply dielectric grease to all connections. Clean solar panels regularly and replace rechargeable batteries annually. Perform seasonal maintenance checks, tightening loose parts and inspecting for damage. Install timers to reduce unnecessary operation and extend bulb life. Store removable lights indoors during severe weather.