We’ve all dreamed of having that perfect creative sanctuary where inspiration flows freely and artistic vision comes to life. Transform your backyard into a stunning art studio that rivals any professional workspace – and you don’t need a massive budget or construction crew to make it happen.
Your art shed can become the ultimate creative retreat where you’ll escape distractions and dive deep into your create. Whether you’re a painter needing natural light or a sculptor requiring workspace for larger pieces we’ll show you how to design the perfect studio that matches your artistic needs.
Ready to turn that unused corner of your yard into your dream workspace? We’re sharing innovative design ideas storage answers and practical tips that’ll help you create an inspiring art shed that boosts your creativity and adds value to your property. Let’s explore how you can build the backyard studio you’ve always wanted.
Transform Your Garden Corner Into a Creative Haven
Converting an underutilized garden corner into your personal art studio requires strategic planning and thoughtful consideration of key environmental factors.
Choose the Perfect Location for Natural Light
North-facing windows provide the most consistent natural light throughout the day. We recommend positioning your art shed to capture this steady illumination since it doesn’t create harsh shadows or color temperature fluctuations that can affect your artwork. Artists who work with color-sensitive mediums like watercolors or oil paints benefit significantly from this orientation.
East-facing locations offer excellent morning light for early risers. Morning sessions in an east-facing studio provide soft warm light that gradually transitions to neutral tones by midday. This setup works particularly well for artists who prefer to complete their work during cooler morning hours.
Consider skylights or large windows when natural light sources are limited. Installing roof windows can increase natural light by up to 40% compared to wall-mounted windows of the same size. We suggest combining multiple light sources to eliminate dark corners and create an evenly lit workspace.
Consider Privacy and Noise Levels
Buffer zones using shrubs or trees create natural sound barriers around your studio. Dense plantings like evergreen hedges or bamboo screens can reduce noise levels by 5-10 decibels while providing visual privacy from neighbors. These living walls also add aesthetic appeal to your garden art space.
Distance from high-traffic areas ensures uninterrupted creative sessions. We recommend positioning your art shed at least 15-20 feet away from patios, play areas, or frequently used garden paths. This separation allows you to focus on detailed work without distractions from household activities.
Interior sound dampening materials enhance concentration during creative work. Installing cork boards, fabric panels, or acoustic foam on interior walls can reduce echo and outside noise interference. These materials also serve dual purposes as display surfaces for artwork or inspiration boards.
Plan for Easy Access Year Round
Paved pathways prevent muddy shoes during wet weather conditions. Installing stepping stones, gravel paths, or concrete walkways ensures you can reach your studio comfortably regardless of season. We suggest creating paths that are at least 3 feet wide to accommodate carrying art supplies and finished pieces.
Proper drainage around your studio foundation prevents water damage and accessibility issues. French drains or simple gravel trenches channel rainwater away from your art shed while keeping the surrounding area dry and walkable. This drainage system protects both your building and creates safe year-round access.
Adequate lighting along pathways ensures safe evening access to your creative space. Solar-powered stake lights or low-voltage LED strips illuminate walkways without requiring complex electrical work. These lighting answers allow you to extend your creative sessions into evening hours while maintaining safe passage to and from your garden studio.
Design Your Art Shed Layout for Maximum Functionality

Strategic layout design transforms your backyard art shed from a simple storage space into a productive creative sanctuary. We’ll focus on three essential elements that maximize both functionality and inspiration in your studio space.
Create Dedicated Storage Answers
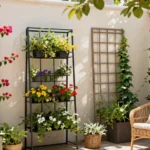
Organize supplies using vertical storage systems that keep materials within easy reach while maintaining a clutter-free workspace. Wall-mounted pegboards accommodate brushes, tools, and small containers while maximizing floor space for larger equipment. Custom shelving units designed for exact art supplies like paint tubes, canvases, and sketchbooks prevent items from getting lost or damaged.
Install multi-functional furniture pieces that serve dual purposes as both storage and display areas. Rolling carts provide mobile storage for frequently used supplies while doubling as surfaces for finished artwork. Built-in drawers beneath work surfaces store paper, fabric, or other flat materials while keeping them protected from dust and moisture.
Design storage zones based on your primary art mediums to streamline your creative process. Painters benefit from dedicated areas for wet and dry supplies, while sculptors need secure storage for tools and materials of varying sizes. We recommend allocating 20-30% of your shed’s floor space to storage answers for optimal organization.
Plan Your Work Surface and Easel Placement
Position primary work surfaces near your shed’s largest windows to harness maximum natural light throughout the day. North-facing windows provide consistent illumination without harsh shadows, making them ideal for detailed work like painting or jewelry making. Adjustable height tables accommodate different art forms and can transition from standing to seated work positions.
Create multiple work zones within your layout to support various creative activities simultaneously. A wet station near water access handles painting and clay work, while a dry station accommodates drawing, crafting, and finishing touches. We suggest allowing at least 3-4 feet of clearance around easels and work surfaces for comfortable movement.
Include mobile work surfaces that adapt to changing project needs and seasonal lighting conditions. Rolling work carts move easily throughout the space, while folding tables store compactly when not in use. Fixed surfaces should measure at least 2 feet deep to accommodate canvases, tools, and reference materials without overcrowding.
Include a Comfortable Seating Area
Establish a dedicated rest zone with ergonomic seating that supports extended creative sessions while reducing physical strain. Comfortable chairs with proper back support enable detailed work like sketching or small-scale crafts without causing fatigue. We recommend positioning seating areas to overlook your garden or backyard for natural inspiration during creative breaks.
Add flexible seating options that serve multiple purposes within your studio space. Ottoman storage provides extra seating for visitors while concealing supplies, and adjustable stools work at various table heights. Cushioned benches against windows create peaceful spots for reflection and planning while maximizing natural light exposure.
Design your seating area to encourage both focused work and relaxation, improving your overall creative experience. A small side table holds beverages, reference books, or current projects within easy reach. Strategic placement near your storage answers allows for quick access to materials while maintaining a comfortable workflow throughout your artistic sessions.
Essential Features Every Backyard Art Studio Needs

Now that we’ve covered layout and design fundamentals, let’s explore the core features that transform any backyard shed into a professional-grade art studio.
Proper Ventilation for Safe Art Practice
Ventilation systems protect our health when working with oil paints, solvents, and other materials that emit potentially harmful fumes. Natural airflow through strategically placed windows and doors creates the foundation for safe art practice in our studios.
Exhaust fans enhance air circulation beyond what natural ventilation alone can provide. We recommend installing these fans near work areas where we use the most chemicals or create the most dust. Air purifiers add another layer of protection by filtering particles and chemical vapors from our workspace atmosphere.
Window placement matters significantly for both ventilation and safety. Cross-ventilation occurs when we position windows on opposite walls, creating airflow patterns that carry fumes away from our breathing zones. This natural air movement reduces our exposure to potentially hazardous materials during extended creative sessions.
Adequate Electrical Outlets and Lighting
Multiple electrical outlets positioned throughout our studio power essential equipment including computers, digital tablets, heaters, and ventilation systems. Modern backyard studios require built-in electrical systems with outlets placed at convenient locations near work surfaces and storage areas.
Floor-to-ceiling windows provide the natural daylight essential for accurate color perception in our paintings and drawings. North-facing windows offer consistent, even lighting throughout the day without harsh shadows or color temperature changes that can affect our artistic judgment.
Supplementary artificial lighting extends our productive hours beyond daylight availability. Adjustable LED lights allow us to customize brightness levels and color temperatures for different artistic techniques. Track lighting systems provide flexibility to direct illumination exactly where we need it most during detailed work sessions.
Climate Control Options for Year-Round Use
Heating and air conditioning systems ensure comfortable working conditions during both cold winters and hot summers in our art studios. Insulated walls combined with HVAC units maintain consistent temperatures that protect both our comfort and our art materials from extreme weather conditions.
Portable heaters and AC units offer cost-effective alternatives to permanent climate control installations. These flexible answers allow us to adjust temperature zones within our studios based on exact activities or seasonal needs. Many prefabricated sheds accommodate easy addition of these portable climate control systems.
Built-in climate control systems provide the most comprehensive year-round comfort in our backyard studios. Professional HVAC installations maintain optimal temperature and humidity levels that protect oil paintings, watercolors, and other moisture-sensitive materials while ensuring our creative productivity throughout all seasons.
Budget-Friendly Art Shed Ideas That Won’t Break the Bank

Creating your dream art studio doesn’t require a massive investment when you explore these cost-effective answers. We’ve identified three practical approaches that can transform your backyard into an inspiring creative space without stretching your budget.
Convert an Existing Garden Shed
Converting your existing garden shed offers the most economical path to establishing a backyard art studio. We recommend starting with a thorough cleaning and fresh coat of paint to brighten the interior space. Adding windows becomes essential for maximizing natural light, which significantly improves your working conditions without increasing energy costs.
Installing shelves and storage answers transforms the basic structure into a functional creative workspace. We suggest wall-mounted pegboards and custom shelving units to keep art supplies organized and easily accessible. This repurposing approach eliminates major construction expenses while making productive use of structures already present on your property.
Build a Simple DIY Structure
Building your own small backyard art studio with basic materials provides complete customization at an affordable price point. We recommend wooden frame sheds or pallet-based structures as charming and functional options that suit various artistic needs. These DIY projects often incorporate vertical gardens, painted accents, and multi-purpose spaces that beautifully blend outdoor elements with art creation.
Time investment and basic DIY skills replace expensive labor costs in this approach. We’ve found that simple designs can accommodate diverse art projects while maintaining construction budgets well below professional studio rental fees. Strategic material selection and creative design elements enhance both functionality and aesthetic appeal.
Repurpose a Prefab Storage Building
Using prefab storage buildings or garden kits allows quick assembly while maintaining lower costs than custom-built studios. We can customize these structures with paint, windows, and interior fittings to perfectly suit exact art requirements. Well-insulated prefab studios have been successfully built on modest budgets under $3,000, providing dedicated spaces for serious creative work.
Assembly speed becomes a important advantage with prefab options, reducing project timelines from weeks to days. We recommend selecting kits that include proper insulation and structural integrity for year-round use. Additional features like skylights or extra windows can be incorporated during assembly to enhance natural lighting conditions.
Inspiring Design Styles for Your Backyard Creative Space

Your backyard art studio design sets the foundation for inspiration and creativity. We’ll explore three distinct styles that transform ordinary sheds into extraordinary artistic spaces.
Rustic Cabin Art Retreat
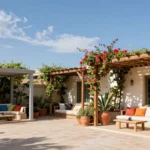
Rustic charm meets artistic functionality in this cozy cabin-inspired design. We love how wooden exteriors and exposed beams create an inviting atmosphere that naturally blends with outdoor surroundings. Earthy tones dominate the color palette while a covered porch extends your creative space beyond four walls.
Potted plants and outdoor seating transform the entrance into a peaceful transition zone. Your artistic mind benefits from this warm, handcrafted ambiance that encourages deep focus and natural inspiration. This style particularly suits artists who crave connection with nature during their creative process.
Natural materials like reclaimed wood enhance the authentic cabin feel while keeping costs reasonable. We recommend incorporating stone accents or rustic hardware to complete the woodland retreat aesthetic.
Modern Minimalist Studio
Clean lines and maximum functionality define this sleek contemporary approach to backyard studios. Large windows or glass doors flood the space with natural light while maintaining the uncluttered aesthetic that minimalism demands. Neutral colors and monochromatic schemes keep visual distractions to a minimum.
Prefabricated kits from companies like Studio Shed offer customizable insulation, lighting, and electrical packages for year-round comfort. We appreciate how these systems create comfortable four-season studios without compromising the minimalist design principles.
Open floor plans maximize workspace efficiency while built-in storage answers maintain the clean aesthetic. Your art becomes the focal point in this distraction-free environment that promotes concentrated creative work.
Bohemian Garden Workshop
Vibrant textiles and eclectic furniture create an inspiring atmosphere in this free-spirited studio style. Colorful elements combine with mismatched pieces to foster relaxed creativity that breaks traditional studio conventions. An abundance of plants and flowers surrounds the shed, bringing nature directly into your artistic practice.
Arts and crafts supplies remain easily accessible through open shelving and creative storage answers. We love how whimsical outdoor areas extend the creative space for plein air painting or messy create projects. This informal, nature-infused environment sparks spontaneous artistic expression.
Mixed patterns and bold colors energize the space while flexible seating arrangements accommodate various creative activities. Your artistic spirit thrives in this lively environment that celebrates creativity over convention.
Storage Solutions to Keep Your Art Supplies Organized

Maintaining an organized art shed requires strategic storage answers that maximize space while keeping supplies accessible. Smart organization systems transform cluttered spaces into efficient creative environments where we can focus on our artistic vision.
Wall-Mounted Organizers and Pegboards
Wall-mounted organizers optimize vertical space by keeping frequently used tools within arm’s reach of our primary work area. Pegboards offer the most flexibility for customizing storage configurations with hooks, baskets, and small shelves that accommodate brushes, palettes, scissors, and drawing tools. These systems free up valuable table and floor space while ensuring supplies remain visible and categorized by function.
Installing pegboards near workstations creates designated zones for exact activities like painting or sketching. Adjustable hooks allow us to modify storage arrangements as our supply collection grows or changes with different projects. Clear containers and magnetic strips attached to pegboards further enhance organization by securing small items like paper clips, erasers, and pencil sharpeners.
Rolling Carts and Mobile Storage
Rolling carts provide mobility that’s particularly valuable in compact art sheds where flexibility matters most. Multi-tiered designs maximize vertical storage capacity while accommodating paints, brushes, markers, and sketchbooks across different levels. These portable units move aside easily when we need to open up workspace or transport materials between different areas within the shed.
Selecting carts with locking wheels ensures stability during active use while maintaining mobility when needed. Deep drawers on rolling units work well for storing larger supplies like canvas boards and portfolios. Wire basket carts offer excellent visibility of contents and provide ventilation for wet materials or recently used brushes.
Built-In Shelving and Drawers
Built-in shelving units handle larger items like canvases, sketchbooks, and paint boxes while maintaining a clean, organized appearance. Custom shelving maximizes every inch of available wall space and can be designed to accommodate exact supply dimensions. Incorporating drawers into these systems creates dedicated spaces for different tool categories such as brushes, pens, and markers.
Transparent or labeled drawers enhance visibility and reduce time spent searching for exact tools during creative sessions. Mason jars mounted on shelves keep brushes upright and visible while adding decorative appeal to the storage system. Clear acrylic drawers work exceptionally well for categorizing supplies by type, making it easy to locate different pen varieties or paintbrush sizes at a peek.
Dedicated water cup stations integrated into built-in storage prevent confusion during painting sessions and keep cleaning supplies organized. Adjustable shelving accommodates changing storage needs as our art supply collection evolves with new techniques and mediums.
Lighting Your Art Shed for Optimal Creativity

Great lighting transforms your art shed from a simple storage space into a professional creative environment. We’ll explore three essential lighting strategies that’ll enhance your artistic vision and productivity.
Maximize Natural Light Sources
Natural light provides the most accurate color rendering and reduces eye strain during long creative sessions. North-facing windows offer the most consistent and indirect light throughout the day without harsh shadows or glare, making them ideal for any art studio setup.
Installing windows strategically maximizes your natural light potential. We recommend large windows or skylights positioned on the north side of your shed for optimal illumination. Skylights work particularly well for spaces with limited wall space or when you need overhead lighting for sculpture work.
Improving light distribution throughout your space requires thoughtful interior design choices. Light-colored walls and reflective surfaces bounce natural light around the room, creating a brighter overall environment. Mirrors placed opposite windows can double your natural light exposure.
maintaining clean windows and keeping them unobstructed ensures maximum light penetration. Heavy curtains or furniture blocking your windows defeats the purpose of installing them in the first place.
Choose the Right Artificial Lighting
Artificial lighting becomes essential for evening work sessions and overcast days when natural light isn’t sufficient. High-wattage LED, fluorescent, or CFL bulbs that emit daylight-balanced light around 5000–6500K color temperature simulate natural sunlight conditions.
Method Lights offer exceptional flexibility for artists who need precise lighting control. These art-exact lights screw into standard fixtures and allow you to change color temperature and positioning from overcast to sunny conditions as your work demands.
Track lighting systems and clamp-on shop lights with adjustable heads provide targeted illumination exactly where you need it. Position these lights to eliminate shadows on your work surface while avoiding glare that could strain your eyes.
Avoiding low-quality bulbs protects your color accuracy and artistic vision. Yellowish warm-toned lights distort color perception, making it difficult to see true colors in your artwork.
Create Mood Lighting for Evening Sessions
Mood lighting creates a relaxing and inspiring atmosphere that encourages creative flow during evening work sessions. Dimmable LED fixtures give you complete control over brightness levels, allowing you to adjust lighting as your creative needs change.
Incorporating warm-toned accent lights like string lights or smaller table lamps fosters coziness without interfering with your main work lighting. These softer lights create ambiance that keeps you comfortable during longer creative sessions.
Strategic placement of mood lights away from your primary art surface prevents color distortion while maintaining a pleasant working atmosphere. Position accent lighting behind your easel or along walls to create depth and visual interest in your space.
Weatherproofing Your Outdoor Art Studio

Creating a weather-resistant art studio ensures your creative space remains functional and comfortable throughout the seasons. Proper weatherproofing protects both your investment and your artistic materials from the elements.
Protect Against Moisture and Humidity
Vapor-permeable roof membranes work best for most climates since they allow moisture vapor inside your structure to escape while preventing external water intrusion. Water barriers that breathe prevent trapped moisture and mold buildup that can damage your artwork and supplies. Climate considerations determine whether you’ll need traditional vapor barriers or can rely on permeable answers – Toronto climate testing shows vapor-permeable products successfully kept studios dry year-round.
Strategic ventilation placement complements your moisture protection system by promoting air circulation. Humidity control becomes easier when you combine proper membrane selection with adequate airflow. Moisture management systems protect expensive art supplies and prevent warping of canvases or paper storage.
Insulation Options for Temperature Control
Proper insulation maintains comfortable working temperatures while reducing energy costs for heating and cooling your studio. Temperature fluctuations damage art supplies and make detailed work difficult during extreme weather. Combining insulation with appropriate vapor management systems creates optimal conditions for year-round creativity.
Thermal regulation through quality insulation materials keeps your space comfortable during both summer heat and winter cold. Energy efficiency improves dramatically when you select insulation that matches your local climate needs. Cost-effective insulation options include fiberglass batts, rigid foam boards, and spray foam depending on your budget and installation preferences.
Durable Flooring That Withstands Wear
Sealed concrete floors handle paint spills and heavy equipment while remaining easy to clean and maintain. Vinyl flooring options provide cushioning for long standing sessions while resisting stains and moisture damage. Treated wood floors offer warmth and natural beauty but require proper sealing to prevent damage from art materials.
Heavy-duty flooring materials extend your studio’s lifespan by eliminating frequent repairs and replacements. Spill-resistant surfaces let you focus on creating rather than worrying about accidental messes. Easy-clean flooring options include epoxy-coated concrete, luxury vinyl planks, and marine-grade treated lumber that stands up to daily use.
Personalizing Your Space with Decorative Touches

Once your backyard art studio has the essential functionality in place, adding personal decorative elements transforms it from a simple workspace into an inspiring creative sanctuary.
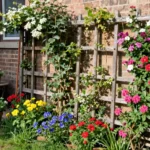
Add Plants and Natural Elements
Incorporating greenery creates a calming atmosphere that enhances our artistic focus while improving the studio’s air quality. Potted plants and flowers placed strategically around and inside the shed bring nature directly into our workspace, making the environment more stimulating and pleasant for extended creative sessions.
Small garden beds or flower boxes positioned on the porch or nearby areas help blend our artistic space seamlessly with the natural backyard industry. Plants like snake plants, pothos, or peace lilies thrive in studio environments and require minimal maintenance while filtering indoor air. Succulents arranged on windowsills add visual interest without overwhelming the space or blocking precious natural light.
Natural elements extend beyond living plants to include materials like river rocks, driftwood pieces, or bamboo screens that create texture and visual depth. These organic touches ground our creative space in nature’s rhythm, fostering a deeper connection between our artistic work and the outdoor environment surrounding us.
Display Your Artwork Creatively
Wall space becomes a ever-changing gallery when we use efficient display systems like hanging wire grids, pegboards, or clip displays to showcase our creations and inspirational pieces. Rotating displayed works regularly keeps our environment fresh and prevents creative stagnation by providing new visual stimulation during different projects.
Gallery walls featuring our finished pieces serve dual purposes by motivating continued artistic growth while helping us visually organize our creative process. Cork boards or magnetic strips allow for quick changes when we need to reference sketches, color swatches, or inspiration images during active projects.
Three dimensional displays using floating shelves or easel stands accommodate sculptures, pottery, or mixed media pieces that require more substantial support. Creating designated zones for different types of artwork prevents our studio from feeling cluttered while ensuring each piece receives proper attention and lighting.
Create an Inspiring Color Palette
Interior colors directly impact our creative energy and focus, making thoughtful palette selection crucial for sustained artistic productivity. Soft neutral tones like warm whites, light grays, or pale beiges provide calming backdrops that won’t compete with our artwork or distract from color accuracy in our pieces.
Bold accent colors strategically placed on feature walls, storage containers, or furniture energize the space without overwhelming our visual senses. Colors like deep teal, warm terracotta, or sage green create focal points that stimulate creativity while maintaining the studio’s professional atmosphere.
Natural light remains the most important element for accurate color perception, requiring multiple windows or skylights to flood our workspace with consistent daylight. Large windows with thoughtful placement maximize natural illumination and privacy, as seen in custom backyard studios from companies like Summerwood or Studio Shed that offer customizable lighting answers customized specifically for artists’ needs.
Conclusion
Your backyard art shed represents more than just additional storage space—it’s an investment in your creative future and property value. We’ve shown you that creating a professional-grade studio doesn’t require a massive budget or construction expertise.
From strategic lighting placement to weatherproofing answers we’ve covered every essential element you’ll need. The key lies in thoughtful planning and prioritizing features that directly impact your artistic workflow.
Whether you choose a rustic cabin aesthetic or modern minimalist design your personalized studio will become the creative sanctuary you’ve always envisioned. Start with one manageable project and gradually build your dream workspace as your needs and budget allow.
Frequently Asked Questions
How much does it cost to build a backyard art studio?
Building a backyard art studio can be surprisingly affordable. Converting an existing garden shed costs $500-2,000, while DIY structures range from $1,000-5,000. Repurposing prefab storage buildings offers a middle-ground option at $2,000-8,000. The key is strategic planning and choosing budget-friendly materials like reclaimed wood and basic insulation.
What’s the best location for an art shed in my backyard?
Choose a location with maximum natural light, preferably with north-facing windows for consistent illumination or east-facing for warm morning light. Consider privacy by using natural barriers like shrubs, ensure year-round access with paved pathways, and check for proper drainage to prevent moisture issues.
Do I need special permits to build an art studio shed?
Permit requirements vary by location and shed size. Most areas allow structures under 120 square feet without permits, but always check local building codes first. If adding electrical work or plumbing, permits are typically required. Contact your local building department for specific regulations in your area.
How do I ensure proper ventilation in my art studio?
Install strategically placed windows for natural airflow and add exhaust fans to remove fumes from art materials. Consider air purifiers for additional safety, especially when working with solvents or spray paints. Proper ventilation prevents moisture buildup and ensures safe working conditions year-round.
What type of flooring works best for an art studio?
Durable, easy-to-clean flooring is essential. Sealed concrete offers excellent durability and stain resistance. Vinyl flooring provides comfort and easy maintenance. Treated wood gives a warm feel but requires sealing. Avoid carpeting as it’s difficult to clean and can harbor dust and chemicals.
How can I maximize storage in a small art shed?
Utilize vertical space with wall-mounted pegboards and shelving systems. Install rolling carts for mobile storage and flexibility. Use built-in drawers and custom shelving for larger items. Overhead storage and under-workbench areas can house seasonal supplies while keeping frequently used items easily accessible.
What lighting do I need for accurate color work?
Maximize natural light with north-facing windows and skylights. For artificial lighting, use high-wattage LED lights with color temperature around 5000K-6500K for accurate color perception. Install adjustable lighting to eliminate shadows and consider mood lighting with dimmable fixtures for relaxing evening sessions.
How do I weatherproof my outdoor art studio?
Use vapor-permeable roof membranes to prevent moisture buildup. Install proper insulation based on your climate needs. Ensure adequate ventilation to prevent condensation. Seal windows and doors properly, and consider heating/cooling solutions for year-round comfort. Regular maintenance prevents weather-related damage.
Can I work in my art studio during winter?
Yes, with proper insulation and heating solutions. Install space heaters, mini-split systems, or radiant heating for temperature control. Ensure adequate insulation in walls and ceiling. Portable heating options provide flexibility, while proper ventilation prevents condensation issues during colder months.
How do I organize different art supply types effectively?
Create designated zones for different art activities. Use clear containers for small supplies, wall-mounted racks for brushes and tools, and drawer systems for paper and canvases. Label everything clearly and keep frequently used items within arm’s reach of your primary work surface.