We’ve all seen those bland concrete walls that make outdoor spaces feel more like prison yards than peaceful retreats. But what if we told you that cement walls could actually become the stunning focal points of your outdoor design?
Cement walls aren’t just functional barriers – they’re blank canvases waiting for your creative touch. From sleek modern panels to textured artistic surfaces we can transform these sturdy structures into eye-catching features that enhance our property values and outdoor living experiences.
Whether you’re looking to create privacy screens define garden spaces or add architectural interest to your backyard we’ll explore innovative cement wall ideas that’ll make your neighbors stop and stare. These versatile answers combine durability with style giving us endless possibilities to express our design vision while standing up to whatever weather throws our way.
Create a Modern Privacy Screen With Smooth Cement Panels
Smooth cement panels offer sleek sophistication while delivering the privacy your outdoor space demands. These contemporary screens blend seamlessly with modern landscaping to create stunning architectural boundaries.
Choose the Right Cement Mix for Weather Resistance
Portland cement with polymer additives forms the foundation of durable outdoor panels that withstand harsh weather conditions. We recommend using a mix ratio of 1 part cement to 2.5 parts fine sand with polymer modifiers for enhanced flexibility and crack resistance.
Fiber reinforcement strengthens the panels against thermal expansion and contraction cycles. Adding polypropylene fibers at 0.1% by volume prevents micro-cracking while maintaining the smooth finish you want.
Waterproofing agents protect your investment from moisture penetration and freeze-thaw damage. Integral crystalline waterproofing admixtures create a permanent barrier that activates when exposed to water.
| Weather Resistance Factor | Recommended Additive | Percentage by Weight |
|---|---|---|
| Crack Prevention | Polypropylene Fibers | 0.1% |
| Water Resistance | Crystalline Waterproofer | 1-2% |
| Flexibility | Polymer Modifier | 5-10% |
| Freeze Protection | Air Entraining Agent | 4-6% |
Install Proper Drainage Behind the Wall Structure
French drain systems behind cement panels prevent water buildup that causes structural damage and staining. We install a 6-inch gravel bed with perforated drainage pipe at the base to channel water away from the wall foundation.
Weep holes at the bottom of panels allow trapped moisture to escape naturally. Spacing these 1/4-inch holes every 24 inches ensures adequate drainage without compromising the panel’s structural integrity.
Vapor barriers between the soil and cement prevent moisture wicking that leads to efflorescence and discoloration. We use 6-mil polyethylene sheeting overlapped by 6 inches and sealed at joints.
Gravel backfill creates a drainage layer that prevents hydrostatic pressure against the panels. Installing 12 inches of crushed stone behind the wall allows water to flow freely to the drainage system below.
Add LED Strip Lighting for Evening Ambiance
Recessed LED channels built into the panel edges create dramatic uplighting effects that highlight the smooth cement texture. We route 1-inch wide channels during the casting process to accommodate waterproof LED strips.
Color temperature selection transforms the mood of your privacy screen from warm residential (3000K) to cool contemporary (5000K). Programmable RGB strips offer unlimited color options for special occasions or seasonal themes.
Low voltage systems ensure safety around water features and irrigation while reducing installation costs. We use 12V or 24V LED strips with weatherproof transformers rated for outdoor use.
Motion sensors activate the lighting automatically when someone approaches the area. Smart controls allow you to adjust brightness levels remotely and set timing schedules that complement your outdoor lifestyle.
Build a Textured Accent Wall Using Stamped Concrete Techniques

Stamped concrete transforms plain cement walls into stunning textured surfaces that replicate natural materials like stone, brick, or wood. This technique involves impressing patterns and textures onto freshly poured concrete, creating visually appealing outdoor walls with a rugged, natural feel perfect for exterior accent applications.
Select Patterns That Complement Your Industry Design
Geometric concrete wall panels featuring triangles, hexagons, or cubes add modern sophistication to contemporary outdoor spaces. These shapes create ever-changing light and shadow interplay throughout the day, improving visual interest while maintaining clean architectural lines.
Fluted wall designs with vertical grooves introduce dimensional depth that complements natural outdoor settings beautifully. The vertical lines draw the eye upward and create texture variations that work especially well with surrounding plantings and industry elements.
Split faced concrete walls offer the most natural appearance by mimicking cut stone through specialized molding techniques. We mold these walls with textured faces and then split them to reveal rough interior surfaces, creating rustic appearances ideal for retaining or accent walls that blend seamlessly with natural surroundings.
Apply Stain Colors to Enhance the Texture Details
Concrete stains penetrate deep into stamped surfaces to accentuate pattern details and texture variations effectively. These stains highlight the depths and shadows within patterns, making textural elements more pronounced and visually striking.
Color selection should harmonize with existing industry elements like natural stone, plant materials, and hardscaping features. Earth tones such as warm browns, deep grays, and sandstone hues work particularly well for outdoor cement wall applications.
Multiple stain colors can be layered to create depth and visual complexity within textured patterns. This technique allows us to highlight raised areas with lighter tones while darker stains settle into recessed pattern areas, creating natural looking color variations.
Seal the Surface for Long-Term Durability
Quality sealers protect textured cement walls from weathering, stains, and UV fading that can compromise appearance over time. We recommend applying sealers within 28 days of concrete curing for optimal protection and adhesion.
Color vibrancy preservation requires regular sealer maintenance every 2 to 3 years depending on exposure conditions. This maintenance schedule ensures that stain colors remain rich and vibrant while protecting the underlying texture integrity.
Weather resistance improves significantly with proper sealing applications that create barriers against moisture penetration and freeze thaw cycles. Professional grade sealers extend the life of textured accent walls in harsh outdoor conditions while maintaining their aesthetic appeal.
Design a Multi-Level Retaining Wall With Integrated Planters

Multi-level retaining walls partition sloped outdoor areas into terraces while controlling soil erosion and expanding usable space. Integrated planters within the wall structure allow for greenery that softens the concrete appearance and adds both aesthetic and ecological value to your outdoor cement wall design.
Calculate Proper Wall Height for Soil Retention
Wall height calculations depend on soil pressure, slope degree, and intended load capacity. We recommend keeping individual wall segments under 4 feet in height to minimize structural requirements and engineering complexities.
Multi-level designs distribute pressure more effectively than single tall walls, reducing the risk of structural failure. Each terrace level should step back 6-12 inches from the wall below to create stable planting areas and improve visual appeal.
Soil type affects wall height requirements significantly, with clay soils exerting more pressure than sandy soils. Professional engineering consultation becomes necessary when total retained soil height exceeds 6 feet or when supporting heavy loads like patios or driveways.
Install Drainage Systems to Prevent Water Damage
Proper drainage behind retaining walls prevents water buildup that can cause wall movement or complete failure. We install gravel backfill extending 12-18 inches behind the wall to create a drainage zone that channels water away from the structure.
Perforated pipes (French drains) should run along the base of the wall, sloping toward natural drainage outlets. Position these drainage pipes 6 inches above the wall foundation and surround them with clean gravel to prevent soil infiltration.
Weep holes integrated into the wall face provide additional moisture escape routes every 6-8 feet along the wall length. We typically install these drainage openings 4 inches above ground level using 3-inch PVC pipes angled slightly downward.
Waterproof membrane application on the soil-facing wall surface adds another layer of protection against moisture penetration. This barrier prevents efflorescence staining and extends the wall’s lifespan significantly.
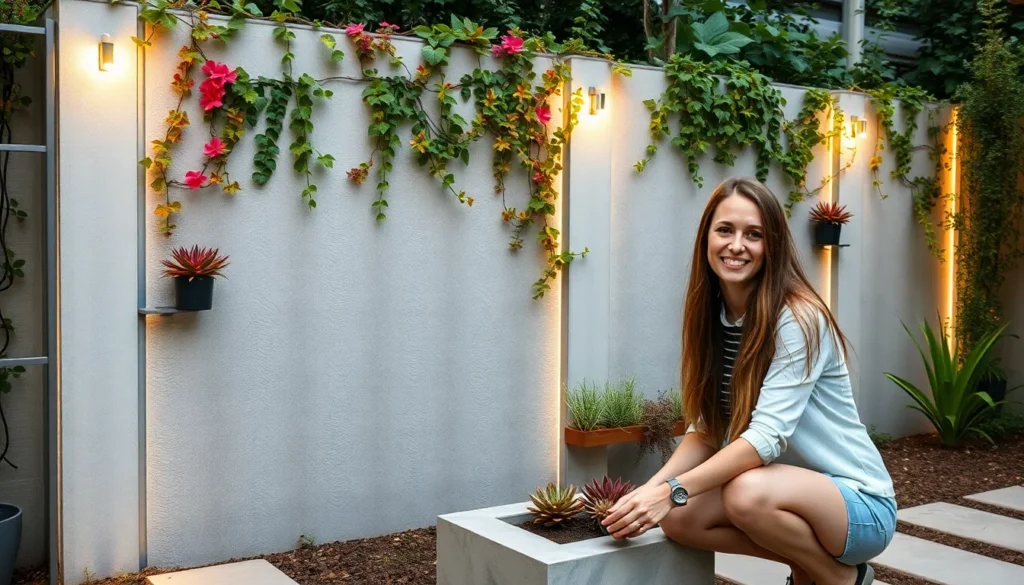
Choose Plants That Thrive in Wall-Mounted Containers
Drought-tolerant plants perform best in wall-mounted containers due to limited soil volume and increased sun exposure. Succulents like sedum, echeveria, and jade plants require minimal maintenance while providing year-round visual interest.
Ornamental grasses such as fountain grass and blue fescue add movement and texture to cement wall planters. These plants tolerate container conditions well and create ever-changing visual effects when paired with geometric concrete panels.
Herbs including rosemary, thyme, and oregano thrive in shallow-rooted environments while providing culinary benefits. We position these aromatic plants at eye level where their fragrance can be easily appreciated.
Compact flowering plants like petunias, marigolds, and impatiens deliver seasonal color bursts in integrated planters. These annuals work particularly well in upper terrace levels where they receive adequate sunlight.
Climbing plants transform adjacent concrete surfaces into living green walls when trained on nearby structures. Ivy and creeping fig cover harsh concrete textures effectively, though they require regular pruning to prevent structural damage.
Construct a Decorative Garden Wall With Built-In Water Features

Water features transform ordinary cement walls into stunning focal points that bring tranquility and elegance to any outdoor space. These integrated designs create soothing soundscapes while serving as impressive architectural elements that enhance your garden’s overall aesthetic appeal.
Plan the Plumbing Layout Before Pouring Concrete
Critical planning ensures your water feature functions flawlessly for years to come. We recommend mapping out all water supply lines, drainage systems, and pump locations before beginning any concrete work. Positioning these elements correctly prevents costly modifications later and guarantees efficient water circulation throughout your wall system.
Embedded plumbing requires secure installation within the concrete structure to support continuous water flow. Professional consultation helps determine the proper pipe sizes and materials needed for your exact design. Early planning allows us to integrate all necessary components seamlessly into the wall’s framework.
Drainage considerations play a vital role in preventing water damage and maintaining system efficiency. Proper slope calculations ensure water flows correctly toward collection points. We suggest installing shut-off valves at strategic locations for easy maintenance and seasonal winterization.
Create Spillways and Collection Basins
Spillways produce the mesmerizing cascade effect that makes water feature walls so captivating. We design these channels to direct water flow evenly across the cement surface, creating consistent water sheets or targeted streams. Proper spillway width and depth control the water’s appearance and sound intensity.
Collection basins capture and recirculate water efficiently while maintaining the system’s visual appeal. These basins can be integrated into the concrete structure or designed as separate decorative elements. Hidden installation methods preserve clean lines while providing necessary functionality for water collection.
Sealing becomes essential for preventing water loss and concrete damage over time. We apply specialized concrete sealers that resist constant moisture exposure while maintaining the wall’s appearance. Proper sealing extends the feature’s lifespan and reduces maintenance requirements significantly.
Basin design options range from simple rectangular forms to curved, naturalistic shapes that complement garden landscaping. Some designs incorporate space for aquatic plants or small fish, transforming the collection area into a miniature network. Proper filtration systems keep water clean and clear for optimal visual impact.
Add Underwater Lighting for Dramatic Night Effects
Underwater LED lighting transforms water features into spectacular nighttime displays that extend outdoor enjoyment hours. We install waterproof fixtures within collection basins or behind cascading water to create stunning illumination effects. Strategic placement highlights water movement and wall textures beautifully.
Color changing capabilities allow customization of the lighting atmosphere for different occasions or seasons. Smart lighting controls enable remote operation and programmable sequences that enhance the feature’s dramatic appeal. These systems can synchronize with existing outdoor lighting for cohesive garden illumination.
Installation timing requires coordination with plumbing and electrical systems during initial construction phases. Professional electricians ensure all underwater fixtures meet safety codes and proper GFCI protection. Proper conduit installation protects wiring from moisture and physical damage over time.
Energy efficient LED options reduce operating costs while providing brilliant illumination for decades. Various beam angles and color temperatures create different moods and highlight exact water feature elements. Dimming capabilities allow fine-tuning of the lighting intensity for perfect ambiance.
Install a Fire-Resistant Outdoor Kitchen Backsplash

Outdoor kitchens require specialized backsplash answers that can withstand intense heat and weather exposure. Creating a durable fire-resistant backsplash protects your cement wall investment while ensuring safety around cooking areas.
Use High-Temperature Cement for Grill Areas
High-temperature cement mixes designed for extreme heat exposure provide the foundation for safe outdoor cooking spaces. These specialized products resist thermal stress and prevent cracking or discoloration when exposed to intense flames from grills or fire pits.
We recommend using cement formulations that can withstand temperatures exceeding 2000°F without structural damage. Portland cement mixed with refractory aggregates like perlite or vermiculite creates an ideal base for grill surroundings.
Applying high-temperature cement in 2-inch thick layers ensures maximum heat resistance and longevity. The cement mixture should cure for at least 28 days before exposure to high heat sources to achieve optimal strength and thermal properties.
Incorporate Tile Accents Into the Cement Surface
Decorative tiles embedded into cement surfaces create visual interest while adding functional heat resistance to backsplash areas. Natural stone tiles, porcelain, or ceramic options work exceptionally well when properly adhered to the cement base.
We suggest using heat-resistant adhesives and grouts specifically formulated for high-temperature applications. Epoxy-based adhesives provide superior bonding strength and can withstand thermal expansion without failing.
Creating mosaic patterns with smaller tiles allows for better thermal movement accommodation compared to large format tiles. Glass tiles reflect heat effectively while adding brilliant color accents that complement stainless steel appliances and natural outdoor elements.
Planning tile layouts during the cement pouring stage enables proper embedding techniques and ensures seamless integration. This approach eliminates potential failure points where tiles might separate from the cement surface over time.
Plan Utility Connections During the Design Phase
Electrical outlets, gas lines, and plumbing connections require careful planning before pouring cement walls for outdoor kitchens. Installing conduit and piping within the wall structure prevents costly retrofitting and maintains clean visual lines.
We recommend consulting with licensed electricians and plumbers during the design phase to determine optimal placement for all utilities. GFCI outlets should be positioned at least 18 inches above the cooking surface and protected within weatherproof enclosures.
Gas line installations must comply with local building codes and require proper venting considerations when enclosed within cement structures. Professional installation ensures safety standards are met and prevents dangerous gas accumulation.
Incorporating cable management systems within the cement walls accommodates future upgrades like smart appliance connections or additional lighting circuits. Oversized conduit allows for easy wire pulling and reduces installation complications during construction phases.
Build a Contemporary Fence Alternative With Geometric Patterns

Geometric concrete wall panels offer a sophisticated upgrade from traditional fencing answers. These architectural elements transform functional boundaries into striking visual statements that enhance your property’s modern appeal.
Cut Clean Lines Using Professional Forming Techniques
Professional forming techniques ensure precise, sharp edges that define contemporary concrete wall aesthetics. We recommend using specialized molds and form liners to achieve the smooth, minimalistic surfaces that complement modern architectural styles.
Quality formwork produces refined finishes including fluted textures and split-faced patterns that add depth without compromising clean lines. These professional-grade techniques create seamless transitions between panels while maintaining the structural integrity essential for outdoor applications.
Strategic placement of form ties and proper concrete curing methods prevent surface imperfections that could detract from the wall’s sleek appearance. The investment in professional forming pays dividends through consistently smooth surfaces that require minimal finishing work.
Create Visual Interest With Alternating Panel Heights
Alternating panel heights introduce ever-changing rhythm and visual depth to outdoor cement walls. This design approach breaks monotonous flat surfaces while creating captivating focal points that draw the eye across the industry.
Varying heights serve multiple functional purposes beyond aesthetics, including privacy modulation and zone definition within outdoor spaces. Taller panels provide screening where needed while shorter sections maintain sight lines and create breathing room in the design.
The strategic use of height variations produces a layered, sculptural effect that plays with perspective and scale throughout your outdoor environment. This technique visually elongates or segments the wall depending on your exact design goals and spatial requirements.
Add Metal Accents for Industrial-Style Appeal
Metal accents create striking contrast against raw concrete textures while adding contemporary industrial flair to outdoor walls. Steel posts, decorative trim, and metallic inserts provide both visual interest and structural support for geometric panel systems.
The juxtaposition of sleek metallic finishes with concrete’s natural texture produces an edgy, modern aesthetic that complements urban and contemporary landscapes. Stainless steel, corten steel, and powder-coated aluminum offer different visual effects while providing weather resistance.
Integration of metal elements during the initial construction phase ensures proper anchoring and alignment with the overall geometric pattern. These accents can frame individual panels or create continuous lines that unify the entire wall system.
Design a Curved Garden Border Wall for Landscape Definition

Curved cement walls bring organic flow to outdoor spaces while creating defined industry boundaries that feel natural and inviting. These flowing structures break away from rigid straight lines, offering endless possibilities for creative garden design.
Use Flexible Forms to Achieve Smooth Curves
Flexible concrete forms transform your vision of graceful curves into reality with remarkable precision. We recommend using modular concrete blocks or specialized forming systems that bend easily without compromising structural integrity. Poured concrete offers the ultimate flexibility for creating custom curves that follow your industry’s natural contours.
Concrete forming kits designed specifically for curved walls simplify the construction process significantly. These systems allow us to achieve smooth, elegant arcs that define garden borders beautifully. The key lies in selecting materials that maintain their shape during the curing process while providing the flexibility needed for curved designs.
Professional forming techniques ensure clean lines and consistent curves throughout the entire wall structure. We suggest using bendable forms made from steel or composite materials for the most precise results. These flexible systems prevent the common issues of angular segments that can interrupt the wall’s flowing appearance.
Match the Wall Color to Existing Hardscape Elements
Color coordination creates seamless integration between your curved wall and existing outdoor features like patios and walkways. We achieve this harmony by tinting concrete or applying specialized stains that complement surrounding hardscape materials. Neutral earth tones work exceptionally well in natural garden settings.
Matching your cement wall to stone, brick, or tile colors requires careful selection of concrete additives and pigments. We recommend testing color samples on small sections before committing to the full project. This approach ensures the final result aligns perfectly with your design vision.
Contemporary landscapes benefit from sleek gray or black finishes that complement modern architectural elements. We can achieve these sophisticated looks through integral color mixing or surface treatments applied after curing. The goal remains creating visual continuity throughout your entire outdoor space.
Integrate Seating Areas Into the Wall Design
Built in seating transforms functional garden borders into inviting gathering spaces that maximize your outdoor area’s potential. We design portions of curved walls at standard seating height, typically 18 inches, to create comfortable perches for relaxation and conversation. Adding wooden slats or cushioned tops enhances comfort significantly.
Strategic placement of seating areas within the curved design creates natural conversation nooks and viewing points throughout your garden. We position these features to take advantage of pleasant views or shaded areas under trees. This thoughtful integration makes the wall both practical and aesthetically pleasing.
Incorporating planters above or beside seating areas adds living elements that soften the concrete’s appearance. We recommend selecting climbing vines or cascading plants that create natural privacy screens. These green additions transform plain cement surfaces into vibrant garden features that change with the seasons.
Create an Art Wall Canvas With Smooth Cement Finish

Transform your ordinary cement wall into a stunning artistic canvas by applying a smooth finish that serves as the perfect foundation for outdoor murals. A properly prepared smooth cement surface enhances both the appearance and longevity of your artwork while providing optimal adhesion for paints and sealers.
Prepare the Surface for Mural Application
Clean the wall thoroughly by removing all dirt, loose particles, and debris using a pressure washer or stiff brush. Patch any cracks or holes with cement-based filler to create a uniform surface that prevents paint from pooling in uneven areas.
Apply a cement-based skim coat or microcement layer over the existing wall to achieve the smooth, refined finish necessary for professional-looking artwork. This specialized coating improves the wall’s texture and creates an optimal canvas for paint application.
Sand the surface lightly once the skim coat is completely dry to eliminate any remaining imperfections or texture variations. Remove all sanding dust with a clean, damp cloth before proceeding to the priming stage.
Prime the wall with a weather-resistant primer specifically formulated for masonry or concrete surfaces to enhance paint adhesion and improve durability. Allow the primer to cure completely according to manufacturer specifications before beginning your mural project.
Choose Weather-Resistant Paints and Sealers
Select exterior-grade acrylic paints designed specifically for cement and concrete surfaces to ensure resistance against fading, cracking, and moisture penetration. These specialized formulations maintain their vibrancy and integrity through various weather conditions.
Invest in high-quality UV-resistant paints for your mural to prevent color degradation from prolonged sunlight exposure. Professional-grade paints designed for outdoor murals contain additional UV blockers that preserve color intensity for years.
Consider elastomeric paints for areas prone to minor wall movement or settling, as these flexible coatings accommodate slight structural changes without cracking. These paints provide superior protection while maintaining the artistic integrity of your design.
Apply a clear waterproof sealer over the completed mural to protect against rain, humidity, and temperature fluctuations that could damage your artwork. This protective barrier significantly extends the mural’s lifespan while preserving its original vibrancy and detail.
Plan the Artwork Scale for Maximum Visual Impact
Consider the wall size and viewing distance when determining your artwork’s scale, as larger walls can accommodate bigger designs with bold, simple shapes for optimal clarity. Measure both the wall dimensions and typical viewing angles to ensure your design creates the desired visual impact.
Use a grid or projection technique to transfer your design accurately onto the wall surface, ensuring proper proportions and alignment throughout the artwork. These methods prevent distortion and maintain the integrity of your original design concept.
Combine your mural with complementary elements like architectural paneling, metal art, or accent paint borders to enhance visual impact and create style cohesiveness with your existing outdoor décor. Strategic placement of these elements can frame your artwork and draw attention to key focal points.
Scale your design elements appropriately by making key features large enough to be appreciated from the intended viewing distance while maintaining sufficient detail to create interest upon closer inspection. This balanced approach ensures your cement wall art canvas delivers maximum visual impact across all viewing scenarios.
Conclusion
We’ve explored countless ways to transform ordinary cement walls into extraordinary outdoor features that enhance both beauty and functionality. From sleek modern panels to textured accent walls and integrated water features these ideas prove that concrete doesn’t have to be boring.
The key to success lies in proper planning and execution. Whether you’re creating an artistic canvas or building multi-level retaining walls with planters remember that quality materials and proper drainage are essential for long-lasting results.
Your outdoor space deserves more than basic boundaries. With these cement wall ideas you can create stunning focal points that increase property value while providing privacy and architectural interest. Start with one project and watch how it transforms your entire outdoor living experience.
Frequently Asked Questions
What are the benefits of using cement walls in outdoor spaces?
Cement walls offer exceptional versatility by serving as creative canvases for various designs while enhancing property value. They provide excellent privacy screening, add architectural interest to backyards, and combine durability with style. These walls can transform bland concrete surfaces into stunning focal points that withstand weather conditions while offering endless design possibilities for modern outdoor spaces.
What cement mix ratio is recommended for weather-resistant outdoor walls?
For optimal weather resistance, use a specific ratio of Portland cement combined with polymer additives to enhance durability. Include fiber reinforcement to prevent cracking and waterproofing agents to resist moisture damage. This combination creates a strong, long-lasting surface that can withstand various weather conditions while maintaining structural integrity over time.
How can I incorporate lighting into cement wall panels?
LED strip lighting can be seamlessly integrated into cement panels during construction for stunning evening ambiance. Choose appropriate color temperatures and consider smart controls for customizable lighting effects. Plan the electrical layout before pouring concrete, ensuring proper waterproofing around all electrical components to prevent moisture-related issues and maintain safety standards.
What drainage considerations are important for cement walls?
Proper drainage is crucial to prevent water buildup and structural damage. Install French drain systems behind walls and include weep holes for moisture escape. Use gravel backfill and perforated pipes to direct water away from the structure. Apply waterproof membranes for additional protection, ensuring long-term durability and preventing costly water-related damage.
Can I create textured designs on cement walls?
Yes, stamped concrete techniques allow you to replicate natural materials like stone, brick, or wood on cement surfaces. Various patterns including geometric designs and fluted styles add sophistication and visual interest. Use concrete stains to enhance texture details and select colors that harmonize with your landscape’s natural elements for a cohesive outdoor design.
What plants work best with cement wall planters?
Select drought-tolerant and shallow-rooted plants for wall-mounted containers, including succulents, ornamental grasses, and herbs. These plants require minimal maintenance while enhancing aesthetic appeal. Consider climbing plants to transform concrete surfaces into living green walls, creating a natural contrast that softens the hard concrete appearance and adds vibrant color to your outdoor space.
How do I prepare cement walls for outdoor murals?
Start with a smooth cement finish by applying a skim coat to create an even surface. Use weather-resistant paints and sealers specifically designed for outdoor applications to ensure mural longevity. Plan artwork scale for maximum visual impact and consider combining murals with complementary landscape elements to create a cohesive and stunning outdoor art installation.
Can cement walls include water features?
Yes, decorative cement walls can incorporate built-in water features with proper planning. Design plumbing layouts before pouring concrete to ensure efficient water circulation. Create spillways and collection basins for captivating water effects, use proper sealing techniques to prevent leaks, and consider underwater LED lighting for dramatic nighttime displays with customizable color options.
What makes cement suitable for outdoor kitchen backsplashes?
High-temperature cement mixes are ideal for outdoor kitchens as they withstand intense heat and weather exposure without cracking or discoloration. These specialized mixes maintain structural integrity near grills and cooking areas. You can incorporate decorative tiles into cement surfaces for added visual interest while enhancing heat resistance and creating functional, attractive cooking spaces.
How can I create curved cement garden borders?
Use flexible concrete forms to achieve smooth, organic curves that create natural flow and defined boundaries. Plan color coordination with existing hardscape elements for visual harmony. Consider integrating built-in seating areas and planters into curved designs to transform functional borders into inviting gathering spaces while softening the concrete’s appearance with natural elements.